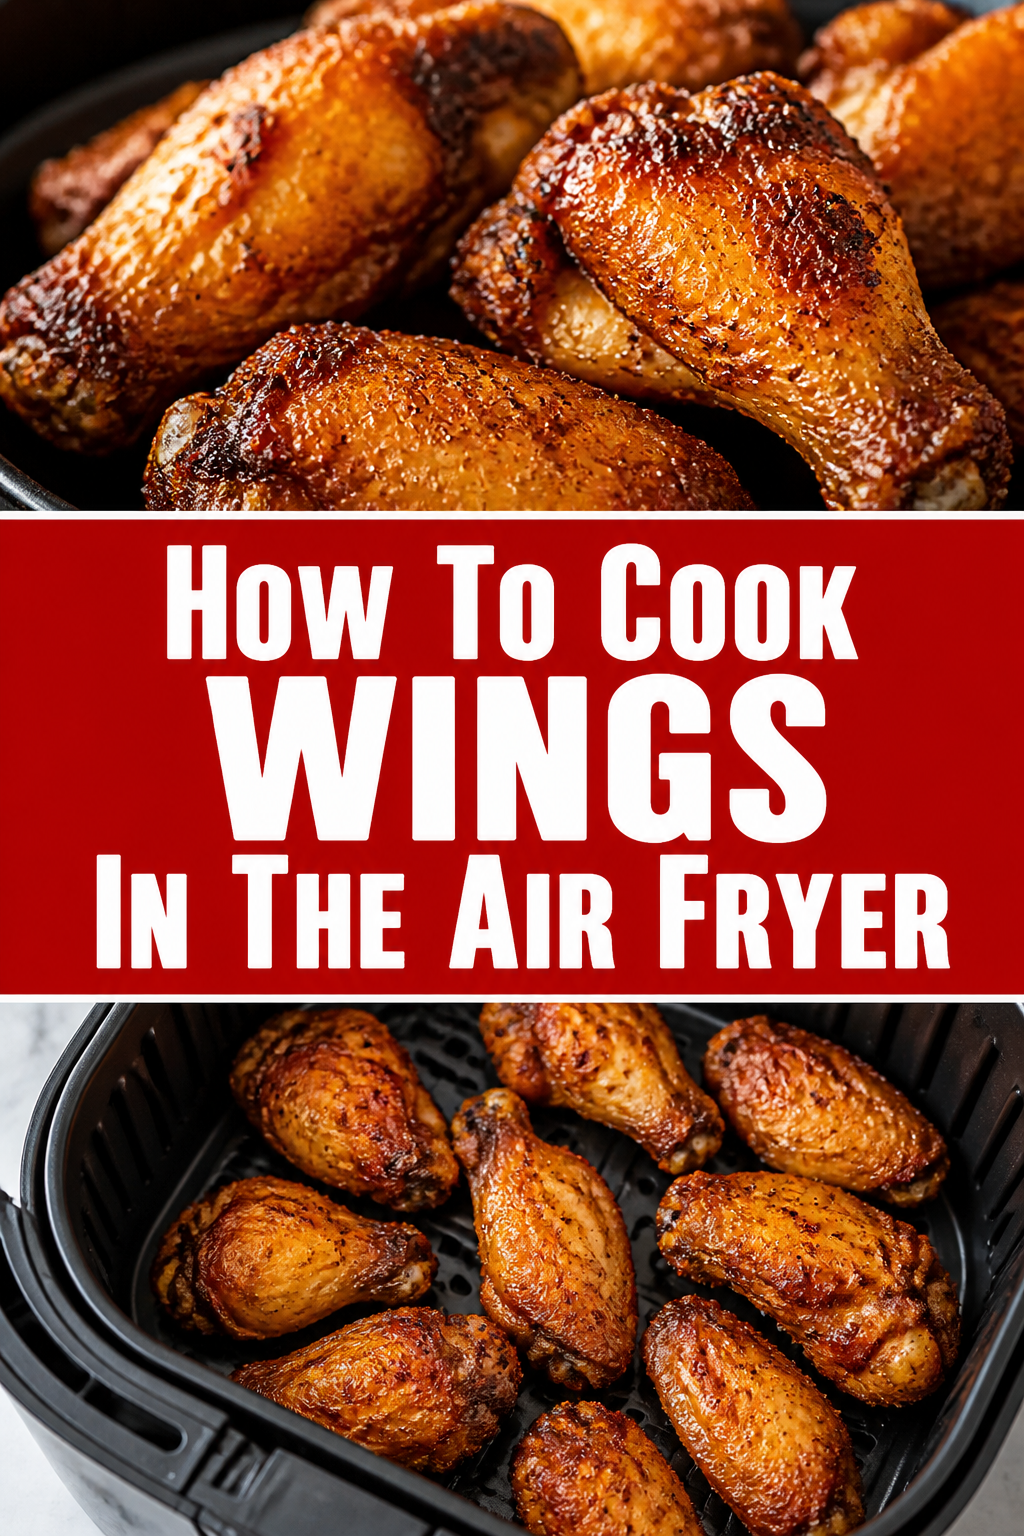
🍗 How To Cook Wings In The Air Fryer
I have spent years trying to replicate the perfect restaurant-style wing in my own kitchen without the mess of a deep fryer.
After hundreds of batches and a few smoky kitchen incidents, I finally mastered the technique that produces skin so crispy it crackles when you bite it.
This guide shares every secret I have learned to help you skip the trial and error and get straight to the best wings of your life.

Quick Overview
You are about to learn how to transform raw chicken wings into golden, crispy perfection using nothing but hot air and a few pantry staples.
- Time needed: 30 minutes
- Difficulty: Beginner
- What you’ll need: Chicken wings, baking powder, salt, pepper, and your favorite sauce.
Step-by-Step Instructions
Step 1: Prep the Wings
Start by patting the chicken wings completely dry with paper towels.
Moisture is the enemy of crispiness because it creates steam instead of a crunch.
Ensure you get into the joints and crevices of every wingette and drumette.
Pro Tip: If you have time, let the wings sit uncovered in the fridge for an hour to air-dry the skin even further.
Step 2: Apply the Secret Ingredient
Toss the dried wings in a large bowl with a mixture of salt, pepper, and aluminum-free baking powder.
Baking powder raises the pH level of the skin, which helps break down the proteins and results in a bubbled, extra-crunchy texture.
Use about one tablespoon of baking powder for every pound of chicken wings.
Coat every piece evenly, but shake off any excess powder so it does not clump.
Step 3: Preheat the Air Fryer
Set your air fryer to 360°F (180°C) and let it run for about five minutes before adding the food.
A hot basket ensures the cooking process starts the moment the chicken touches the surface.
Avoid skipping this step, as a cold start often leads to the skin sticking to the basket grates.
Step 4: Arrange in a Single Layer
Place the wings into the air fryer basket, making sure they do not touch or overlap.
Air fryers rely on rapid air circulation to cook, so crowded wings will end up soggy on the sides.
Cook in multiple batches if your air fryer is small rather than trying to cram them all in at once.
Pro Tip: Leave at least half an inch of space between each wing for maximum airflow.
Step 5: The First Cook
Cook the wings at 360°F for 12 minutes to render out the fat from the skin.
This lower temperature allows the fat to melt away without burning the exterior too quickly.
Check the wings halfway through this stage to see how the browning is progressing.
Step 6: The Shake and Flip
Remove the basket and give it a vigorous shake to reposition the wings.
Use silicone-tipped tongs to flip any wings that seem stuck or are not browning evenly.
Slide the basket back in and cook for another 12 minutes at the same temperature.
Step 7: The High-Heat Finish
Increase the temperature of the air fryer to 400°F (200°C) for the final push.
Cook for an additional 5 to 6 minutes until the skin is deep golden brown and visibly bubbling.
This final blast of high heat is what creates that signature “fried” texture without the oil.
Step 8: Toss in Sauce
Transfer the hot wings to a clean bowl and immediately pour your sauce over them.
The heat from the wings helps the sauce thicken and adhere to the crispy skin.
Toss gently with a spatula to ensure every wing is fully coated without breaking the skin.
Pro Tip: If you prefer “dry” wings, toss them in a spice rub instead of a liquid sauce at this stage.
Step 9: Let Them Rest
Wait two to three minutes before serving your wings to the table.
This brief resting period allows the juices to redistribute and the sauce to set slightly.
Serve with cold celery sticks, carrots, and a side of ranch or blue cheese dressing.
Common Mistakes to Avoid
Overcrowding the Basket
Many people try to cook two pounds of wings at once in a standard-sized basket.
When wings touch, the steam gets trapped between them, resulting in rubbery, pale skin.
It is always better to eat two batches of perfect wings than one batch of mediocre ones.
Using Regular Flour Instead of Baking Powder
Flour can create a breaded texture, but it often turns gummy or pasty in an air fryer.
Baking powder is a chemical leavener that reacts with the chicken’s natural juices to create tiny air bubbles.
Make sure you are not accidentally using baking soda, which will leave a bitter, metallic taste.
Forgetting to Pat the Wings Dry
Even if the wings look dry out of the package, they usually have a thin film of moisture.
If you skip the paper towel step, the baking powder will turn into a wet paste rather than a light coating.
Dry skin is the absolute foundation of a successful air-fried wing.
Using Too Much Oil
Chicken wings already have a high fat content in the skin that renders out during cooking.
Adding a lot of extra oil can actually prevent the skin from crisping up properly.
A very light spritz of oil is all you need if you are worried about sticking, but often, no oil is required at all.
Troubleshooting
The Wings Are Sticking to the Basket
This usually happens if the basket wasn’t preheated or if the wings were too wet when they went in.
Next time, try lightly brushing the basket with a high-smoke-point oil like avocado oil before adding the chicken.
If they are already stuck, wait another minute or two for the skin to crisp further; it will often release itself from the metal once it is fully cooked.
The Wings Are Cooked But Not Crispy
This is a sign that the temperature wasn’t high enough or the wings were too crowded.
Try increasing the final cooking stage at 400°F by another 2 to 3 minutes.
Check that your air fryer’s fan is working properly, as air circulation is the key to the texture.
The Baking Powder Left a White Residue
This happens when too much powder was used or it wasn’t tossed thoroughly enough.
You can fix this by lightly spraying the white spots with a tiny bit of oil, which helps the powder dissolve and brown.
In the future, use a finer mesh strainer to dust the powder over the wings for a more even coat.
Key Takeaways
- Dryness is essential: Always use paper towels to remove every drop of moisture from the raw chicken.
- Baking powder magic: Use aluminum-free baking powder to achieve a restaurant-style crunch without deep frying.
- Two-stage cooking: Start at a moderate heat to render fat and finish at high heat to crisp the skin.
- Space matters: Keep the wings in a single layer with plenty of room for air to flow between them.
- Sauce at the end: Never put sauce on the wings before air frying, as the sugars will burn before the chicken is done.
- Shake the basket: Moving the wings around ensures that every side gets direct contact with the hot air.
Frequently Asked Questions
Can I cook wings from frozen in the air fryer?
Yes, you can cook frozen wings, but you will need to add about 5 to 10 minutes to the initial cooking time.
It is harder to get frozen wings as crispy because they release a lot of moisture as they thaw in the basket.
For the best results, thaw them in the refrigerator overnight and follow the standard drying process.
What is the best sauce for air fryer wings?
Classic buffalo sauce made with melted butter and hot sauce is a fan favorite because it clings well to the skin.
Honey garlic or barbecue sauces are also excellent, but they should only be applied after the wings are finished cooking.
If you like dry wings, a lemon pepper or cajun seasoning rub can be applied right before the final high-heat stage.
Is it healthy to cook wings in an air fryer?
Air frying is significantly healthier than deep frying because it uses very little to no added oil.
The process actually allows much of the natural fat in the chicken skin to drip away into the bottom of the basket.
You get the same satisfying crunch with a fraction of the calories and fat found in traditional fried wings.
How do I reheat leftover wings so they stay crispy?
Avoid the microwave, as it will make the skin soggy and the meat rubbery.
Put the leftover wings back into the air fryer at 350°F for 3 to 5 minutes until they are heated through.
This will revive the crispiness of the skin even if they have already been sauced.
Our Top Recommended Finds
- Digital Meat Thermometer: This helps you ensure the wings reach an internal temperature of 165°F without overcooking them.
- Silicone Tongs: These are perfect for flipping wings without scratching the non-stick coating of your air fryer basket.
- Aluminum-Free Baking Powder: A specific pantry staple that is necessary for the skin-crisping technique mentioned in this guide.
Elevate Your Next Game Day Spread
Now that you have the technique down, you can experiment with an endless variety of flavors and heat levels.
Try pairing your crispy wings with a homemade blue cheese dip or a side of air-fried sweet potato fries.
Grab a pack of wings from the store today and put these steps to the test for your next meal.