🦃 How To Cook A Turkey In The Oven
Cooking a turkey might seem like a daunting task, especially if it’s your first time hosting a big meal.
I remember my own anxieties before my first Thanksgiving bird, a weighty 18-pounder staring back at me from the fridge.
But with the right approach and a clear roadmap, you’ll discover it’s incredibly rewarding and surprisingly straightforward.

Quick Overview
This guide will walk you through preparing and roasting a delicious, juicy turkey right in your own oven. You’ll learn the essential steps from thawing to carving, ensuring a memorable meal for everyone at your table.
- Time needed: 1-3 days for thawing (depending on size), 30 minutes active prep, 3-5 hours roasting (for a 12-15lb turkey), 30 minutes resting.
- Difficulty: Intermediate
- What you’ll need: A large roasting pan with a rack, a reliable meat thermometer, basting tool, sharp carving knife, and a sturdy cutting board.
Step-by-Step Instructions
Step 1: Thaw Your Turkey Safely
Proper thawing is the critical first step for food safety and even cooking. Never thaw a turkey at room temperature on the counter.
The safest method is in the refrigerator. Plan ahead, as this takes a significant amount of time.
Allow approximately 24 hours of thawing time for every 4-5 pounds of turkey. A 15-pound turkey will need 3-4 days in the fridge.
Place the frozen turkey, still in its original packaging, on a tray or in a pan to catch any drips as it thaws. This prevents cross-contamination.
Pro Tip: For faster thawing, you can use the cold water method. Place the turkey (in its sealed packaging) in a large sink or cooler filled with cold water. Change the water every 30 minutes. Allow 30 minutes per pound, so a 15-pound turkey would take about 7-8 hours. Cook immediately after thawing this way.
Step 2: Prepare Your Workspace and Turkey
Once thawed, remove the turkey from its packaging. You’ll find a neck and a bag of giblets (heart, liver, gizzard) inside the turkey’s cavity, often tucked into the front or back.
Carefully reach inside and remove both the neck and the giblet bag. These can be saved for gravy or discarded.
Pat the entire turkey dry with paper towels, both inside and out. A dry skin promotes crispier results.
Set your oven rack to the lowest position to ensure the turkey fits comfortably without touching the top heating element.
Step 3: Season Your Turkey Generously
Flavor starts here. Decide if you want to brine your turkey beforehand (an optional step for extra moisture, not covered in this basic guide).
For a basic, delicious turkey, begin by rubbing the entire bird with softened butter or olive oil. This helps the skin crisp and carries the seasoning.
Next, season generously with salt, black pepper, and any herbs you love. Classic choices include sage, thyme, and rosemary. Don’t forget to season the cavity as well.
You can also place aromatics like quartered onions, garlic cloves, lemon halves, and fresh herbs (thyme, rosemary) inside the cavity for added flavor. Do not densely stuff the turkey with traditional stuffing if you want it to cook evenly and safely.
Pro Tip: For extra crispy skin, gently separate the skin from the breast meat with your fingers and rub some softened butter and seasoning directly onto the meat underneath. This adds flavor and moisture where it counts.
Step 4: Position and Roast Your Turkey
Preheat your oven to 325°F (160°C). A lower, slower temperature helps ensure even cooking and prevents the outside from burning before the inside is done.
Place the turkey breast-side up on a rack in a large roasting pan. Using a rack allows air to circulate around the entire bird, promoting even cooking and crispy skin.
You can pour a cup or two of chicken broth or water into the bottom of the roasting pan. This helps keep the oven humid and can be used for basting or gravy later.
Insert an oven-safe meat thermometer into the thickest part of the thigh, making sure it doesn’t touch the bone. This will be your primary guide for doneness.
Step 5: Basting and Monitoring Temperature
Roasting times vary greatly depending on the turkey’s size and whether it’s stuffed or unstuffed. An unstuffed 12-15 pound turkey typically takes 3-4 hours.
Baste the turkey every 45-60 minutes with the pan drippings or a mixture of butter and broth. This helps keep the skin from drying out and adds flavor, though some argue it’s not strictly necessary for moisture, only for browning.
If the breast skin starts to brown too quickly, loosely tent the turkey with aluminum foil. Remove the foil for the last 30-60 minutes of cooking to allow the skin to crisp up again.
The turkey is done when the internal temperature in the thickest part of the thigh reaches 175-180°F (79-82°C) and the breast meat reaches 165°F (74°C). Always check in multiple spots to ensure even cooking.
Pro Tip: Don’t rely solely on the pop-up timer that often comes with turkeys. These are notoriously inaccurate. A good digital meat thermometer is your best friend here.
Step 6: Rest Your Turkey
This step is non-negotiable for a juicy turkey. Once the turkey reaches the target internal temperature, remove it from the oven.
Transfer the turkey to a clean cutting board or serving platter. Loosely tent it with aluminum foil.
Allow the turkey to rest for at least 20-30 minutes, or even up to an hour for larger birds. This allows the juices to redistribute throughout the meat, resulting in a much more tender and flavorful bird.
If you carve too soon, all those delicious juices will run out onto your cutting board, leaving you with dry meat.
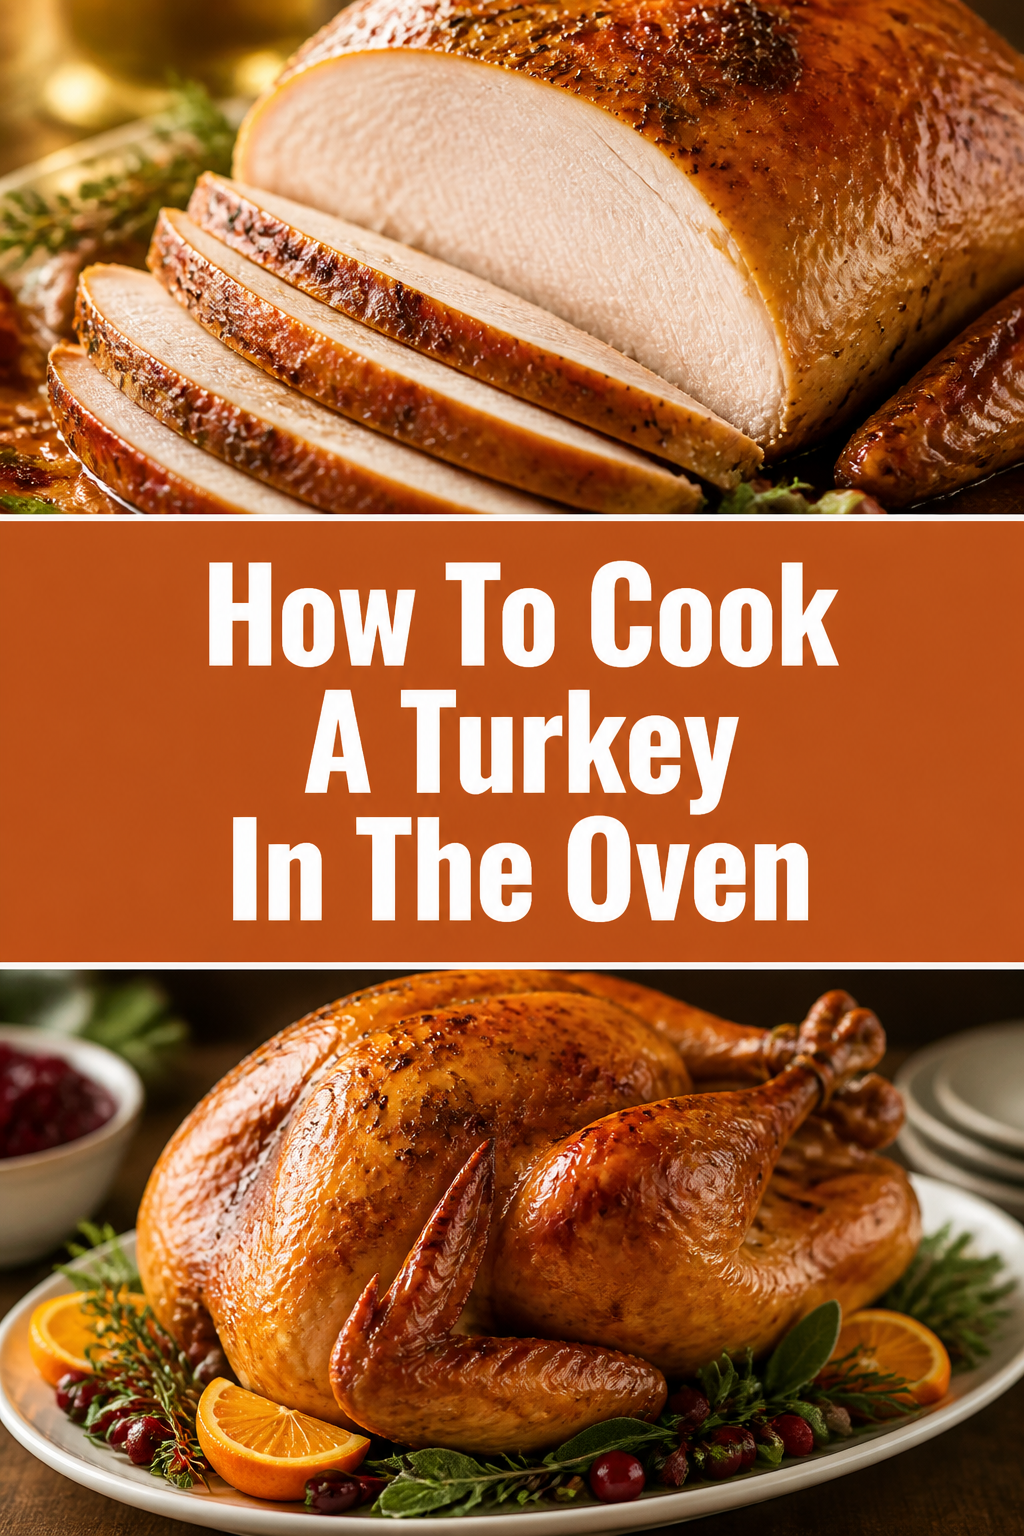
Step 7: Carve and Serve
After resting, your turkey is ready for carving. A sharp carving knife and a carving fork are essential tools.
Start by removing the legs and thighs. Locate the joint where the thigh connects to the body and cut through it.
Separate the drumstick from the thigh. Then, slice the breast meat by making a horizontal cut above the wing, then slicing downwards from the top of the breastbone.
Arrange the carved slices attractively on a warm platter. Serve immediately with your favorite sides and, of course, homemade gravy made from those wonderful pan drippings!
Common Mistakes to Avoid
Not Thawing Completely
A partially frozen turkey will cook unevenly, with some parts overcooked and dry while others remain undercooked and unsafe. Always ensure your turkey is fully thawed before it goes into the oven. Plan several days in advance for refrigerator thawing.
Overcrowding the Roasting Pan
If your turkey is too large for your roasting pan, it won’t cook evenly, and the skin won’t crisp up properly. Ensure there’s enough space around the bird for hot air to circulate. A proper roasting rack also helps tremendously.
Overcooking the Turkey
This is the most common culprit for dry turkey. Relying on visual cues or a pop-up timer is a recipe for disappointment. Use a reliable meat thermometer and pull the turkey out of the oven as soon as it hits the target internal temperature. Remember the temperature will rise slightly during resting.
Not Resting the Turkey
Impatience can ruin hours of hard work. Skipping the resting step means all the delicious juices, which have migrated to the center of the bird during cooking, will simply drain out when you carve. This leaves you with dry, tough meat. Always rest your turkey.
Troubleshooting
Dry Breast Meat
If your turkey breast tends to dry out, you likely overcooked it or didn’t protect it during roasting. Next time, try tenting the breast with foil earlier in the cooking process. You can also try brining the turkey beforehand for added moisture retention. Ensuring proper resting time is also key.
Uneven Browning
If one side of your turkey is browning faster than the other, your oven might have hot spots. Try rotating the roasting pan halfway through the cooking process. If the breast is browning too quickly, tent it with foil, especially towards the end of the cooking time.
Turkey Taking Too Long to Cook
Several factors can cause this. Your oven temperature might be inaccurate (consider an oven thermometer), the turkey might not have been fully thawed, or it could be a particularly dense bird. Ensure your thermometer is accurate and keep cooking until the internal temperature is reached. Avoid opening the oven door too frequently, as this drops the internal temperature.
Key Takeaways
- Always thaw your turkey safely and completely in the refrigerator or cold water.
- Use a reliable meat thermometer to ensure proper doneness and prevent overcooking.
- Generously season your turkey, including under the skin, for maximum flavor.
- Roast at a steady, moderate temperature (325°F/160°C) for even cooking.
- Rest the turkey for at least 20-30 minutes after cooking to redistribute juices.
- Carve against the grain for tender, juicy slices.
Frequently Asked Questions
How long does it take to thaw a turkey in the refrigerator?
Plan for roughly 24 hours of thawing time for every 4-5 pounds of turkey. A 15-pound turkey will need 3-4 days to thaw completely in the refrigerator. Make sure it’s on a tray to catch any drips.
How much turkey should I buy per person?
A good rule of thumb is to buy 1 to 1.5 pounds of turkey per person. If you want leftovers, aim for 1.5 to 2 pounds per person. This accounts for bone weight and ensures plenty of food.
Can I cook a turkey from frozen?
While technically possible, it’s not recommended for a first-timer as it significantly increases cooking time (by about 50%) and makes it difficult to remove giblets or season properly. Always thaw your turkey for best results.
What’s the ideal internal temperature for a cooked turkey?
The turkey is safely cooked when the internal temperature reaches 165°F (74°C) in the thickest part of the breast, and 175-180°F (79-82°C) in the thickest part of the thigh. Always check in multiple spots with a reliable meat thermometer.
Our Top Recommended Finds
- Digital Meat Thermometer: Essential for accurate temperature readings, preventing both under and overcooking. Look for one with a probe that stays in the turkey while it cooks.
- Large Roasting Pan with Rack: A sturdy pan with a good rack allows for even cooking and excellent drippings collection for gravy.
- Carving Knife Set: A sharp, long carving knife and a sturdy carving fork make the post-roast carving process much easier and safer.
Your Culinary Triumph Awaits
You now have the knowledge and confidence to tackle cooking a turkey in your oven. This guide provides a solid foundation, but remember that practice makes perfect.
Don’t be afraid to experiment with different seasonings or techniques as you gain experience.
Gather your ingredients, set aside the time, and prepare to impress your guests with a beautifully roasted turkey. Your next holiday meal, or any special occasion, is about to become even more memorable.