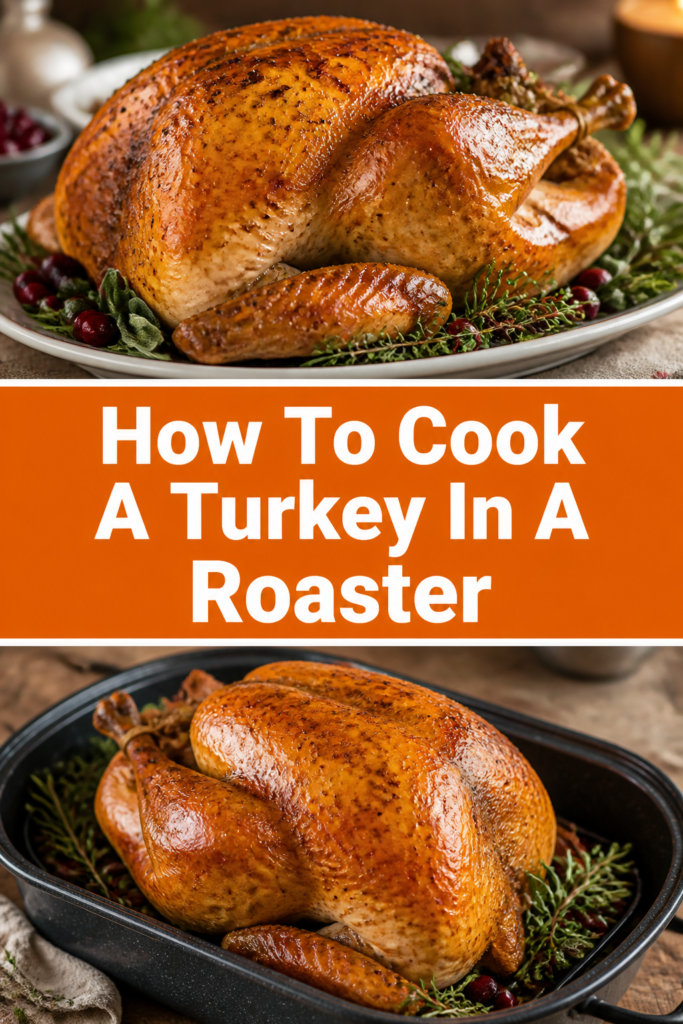
🦃 How To Cook A Turkey In A Roaster
The thought of cooking a whole turkey can feel daunting. For years, I wrestled with dry birds and uneven cooking. Learning to use an electric roaster changed everything for me. This guide shares the simple, effective method I’ve perfected over many holidays.
Quick Overview
You are about to master a foolproof way to cook a wonderfully moist and flavorful turkey. Using an electric roaster oven simplifies the process, frees up your conventional oven, and delivers consistent results every time. Get ready to impress your guests with minimal stress.
- Time needed: 4-6 hours (for a 12-18 lb turkey, plus thawing/prep)
- Difficulty: Beginner
- What you’ll need: Electric roaster oven, large turkey, meat thermometer, basic seasonings
Step-by-Step Instructions
Step 1: Thaw Your Turkey Completely
Begin by ensuring your turkey is fully thawed. This is the most crucial first step for even cooking and food safety. A partially frozen turkey will cook unevenly and can harbor bacteria.
Plan ahead for thawing time. Allow approximately 24 hours in the refrigerator for every 4-5 pounds of turkey. A 15-pound turkey needs about 3-4 days to thaw completely.
Place the wrapped turkey on a baking sheet or in a large pan to catch any drips. This prevents cross-contamination in your refrigerator. Never thaw a turkey at room temperature.
Pro Tip: If you’re short on time, use the cold water thawing method. Submerge the wrapped turkey in cold water, changing the water every 30 minutes. This takes about 30 minutes per pound.
Step 2: Prepare Your Turkey for Roasting
Remove the turkey from its packaging once thawed. Take out the neck and giblet bag from both cavities. These are usually found in the main body cavity and the neck cavity.
Pat the turkey dry with paper towels, both inside and out. A dry surface helps achieve a crispier skin. Excess moisture can steam the skin, preventing browning.
Consider a brine if you desire extra moisture and flavor. A simple salt and sugar brine can make a significant difference. If you brine, remember to rinse the turkey thoroughly and pat it dry again before seasoning.
Step 3: Season for Maximum Flavor
Prepare your seasoning mixture. A classic blend includes salt, black pepper, garlic powder, onion powder, and dried herbs like sage, thyme, and rosemary. You can also use a pre-made poultry seasoning blend.
Rub the turkey generously with olive oil or melted butter. This helps the seasonings adhere to the skin and promotes browning. Don’t be shy; cover the entire surface.
Apply your chosen seasonings liberally over the entire turkey. Gently lift the skin over the breast to rub some seasoning directly onto the meat for deeper flavor.
Stuff the turkey cavities with aromatics like quartered onions, celery stalks, apple halves, or fresh herb sprigs. These contribute to the turkey’s internal flavor and moisture. Do not pack the cavity tightly with traditional stuffing, as this can prevent even cooking.
Step 4: Set Up Your Roaster Oven
Preheat your electric roaster oven to 325°F (160°C). Allow it at least 20-30 minutes to reach the desired temperature. A consistent temperature is key to successful roasting.
Place the roasting rack inside the roaster oven. This elevates the turkey, allowing air to circulate and preventing the bottom from getting soggy. It also lets drippings collect below.
Position the prepared turkey directly on the roasting rack, breast-side up. Ensure it fits comfortably within the roaster without touching the sides or lid.
Pro Tip: For extra flavor in your drippings, pour 1-2 cups of chicken broth or water into the bottom of the roaster, beneath the rack. This also helps keep the turkey moist.
Step 5: Roast to Perfection
Insert a meat thermometer into the thickest part of the turkey thigh, without touching the bone. This will be your primary guide for doneness. Do not rely solely on cooking time.
Place the lid securely on the roaster oven. The tight seal of a roaster oven helps to trap moisture, which is why roaster turkeys are often incredibly juicy.
Cook the turkey according to its weight. A general guideline is 15-20 minutes per pound for an unstuffed turkey at 325°F (160°C). Keep the lid closed as much as possible to maintain heat and moisture.
Avoid opening the lid frequently. Each time you lift the lid, the temperature inside drops significantly, extending the cooking time and potentially drying out your bird.
Step 6: Monitor Temperature and Rest
Begin checking the internal temperature of the turkey about 1-2 hours before the estimated cooking time is complete. The target temperature for doneness is 165°F (74°C).
Insert the thermometer into the thickest part of the thigh, the wing joint, and the thickest part of the breast. All areas must reach 165°F (74°C).
Remove the turkey from the roaster oven once it reaches the correct temperature. Transfer it to a large cutting board or serving platter.
Tent the turkey loosely with foil. Allow it to rest for at least 20-30 minutes before carving. This resting period is critical; it allows the juices to redistribute throughout the meat, ensuring a tender and moist result.
Step 7: Carve and Serve
Carve the turkey after it has rested. Use a sharp carving knife and fork. Start by removing the legs and thighs, then the wings.
Slice the breast meat against the grain for maximum tenderness. Arrange the carved meat on a warm platter.
Serve your beautifully roasted turkey with your favorite side dishes. Enjoy the compliments on your perfectly cooked, juicy bird.
Common Mistakes to Avoid
Not Thawing Completely
Attempting to cook a partially frozen turkey is a common pitfall. The exterior will overcook and dry out long before the interior thaws and reaches a safe temperature. This results in unevenly cooked meat and potential food safety risks. Always ensure your turkey is fully thawed before it enters the roaster.
Overcooking the Turkey
Many people cook turkey until it’s dry, thinking longer is safer. Overcooking is the quickest way to ruin a turkey’s texture and flavor. The meat becomes stringy and loses all its moisture. Always rely on a reliable meat thermometer to know when your turkey is done, not just the clock.
Forgetting to Rest the Turkey
Carving a turkey immediately after it comes out of the roaster is a mistake that leads to dry meat. The juices need time to redistribute through the muscle fibers. Cutting too soon causes all those delicious juices to run out onto the cutting board, leaving you with less flavorful meat.
Opening the Roaster Lid Too Often
The sealed environment of a roaster oven is its biggest advantage for moisture. Each time you lift the lid, you release accumulated heat and moisture. This significantly extends cooking time and can dry out the turkey. Resist the urge to peek frequently; trust your thermometer.
Troubleshooting
Turkey Skin Not Browning
Sometimes, a roaster oven doesn’t provide the same crisp, brown skin as a conventional oven. To fix this, remove the lid of the roaster during the last 30-45 minutes of cooking. You can also increase the temperature to 375°F (190°C) for the final 20 minutes, keeping a close eye on it.
Turkey Taking Too Long to Cook
If your turkey is taking significantly longer than expected, first check that your roaster oven is indeed at the correct temperature. An oven thermometer placed inside the roaster can verify this. Ensure the lid is securely in place and has not been opened frequently. If the turkey was partially frozen, this is a common reason for extended cooking times.
Turkey Meat is Dry
Dry turkey usually indicates overcooking or not allowing the turkey to rest. If your turkey turned out dry, ensure you removed it precisely at 165°F (74°C) next time. Also, a proper resting period is non-negotiable for juicy meat. Consider brining your turkey for future cooks to add an extra layer of moisture insurance.
Key Takeaways
- Always ensure your turkey is fully thawed before beginning to cook.
- Use a meat thermometer to accurately gauge doneness, aiming for 165°F (74°C) in the thickest parts.
- Resist the urge to frequently lift the roaster lid to maintain consistent heat and moisture.
- Rest the turkey for at least 20-30 minutes after cooking to allow juices to redistribute.
- Patting the turkey dry and liberal seasoning are crucial for flavor and potential browning.
Frequently Asked Questions
Should I baste a turkey in a roaster oven?
Basting is generally not necessary when cooking a turkey in an electric roaster oven. The roaster’s sealed environment creates a moist cooking chamber, effectively self-basting the turkey. Opening the lid to baste can actually lengthen cooking time and release valuable moisture.
What size turkey can fit in a roaster oven?
Most standard 18-quart electric roaster ovens can accommodate a turkey up to 20-22 pounds. Larger 22-quart models can handle turkeys up to 24-26 pounds. Always check your specific roaster oven’s capacity guidelines.
Can I put stuffing inside a turkey cooked in a roaster?
It is generally not recommended to put traditional stuffing inside a turkey cooked in a roaster oven. The moist environment can make it difficult for the stuffing to reach a safe internal temperature of 165°F (74°C) without overcooking the turkey meat. Cook stuffing separately for best results.
Do I need to add water to the bottom of the roaster?
While not strictly required, adding 1-2 cups of water or chicken broth to the bottom of the roaster (under the rack) can enhance moisture and flavor in your drippings. This also helps prevent any drippings from scorching at the bottom of the pan, making cleanup easier.
Our Top Recommended Finds
- Electric Roaster Oven: A reliable 18-quart model is a game-changer for holiday meals, freeing up your main oven.
- Digital Meat Thermometer: An instant-read thermometer is essential for accurately checking doneness and preventing overcooked turkey.
- Turkey Carving Set: A sharp carving knife and a sturdy carving fork make serving your perfectly cooked bird much easier.
Your Next Culinary Triumph Awaits
You now have all the knowledge and practical steps to cook a truly magnificent turkey in an electric roaster. This method simplifies what many find to be the most intimidating part of a holiday meal, guaranteeing a succulent, flavorful bird every time.
Don’t let the size of the bird deter you. Embrace the ease and efficiency of your roaster oven. Prepare to savor the compliments and enjoy a stress-free feast. Now, go confidently prepare your delicious turkey!