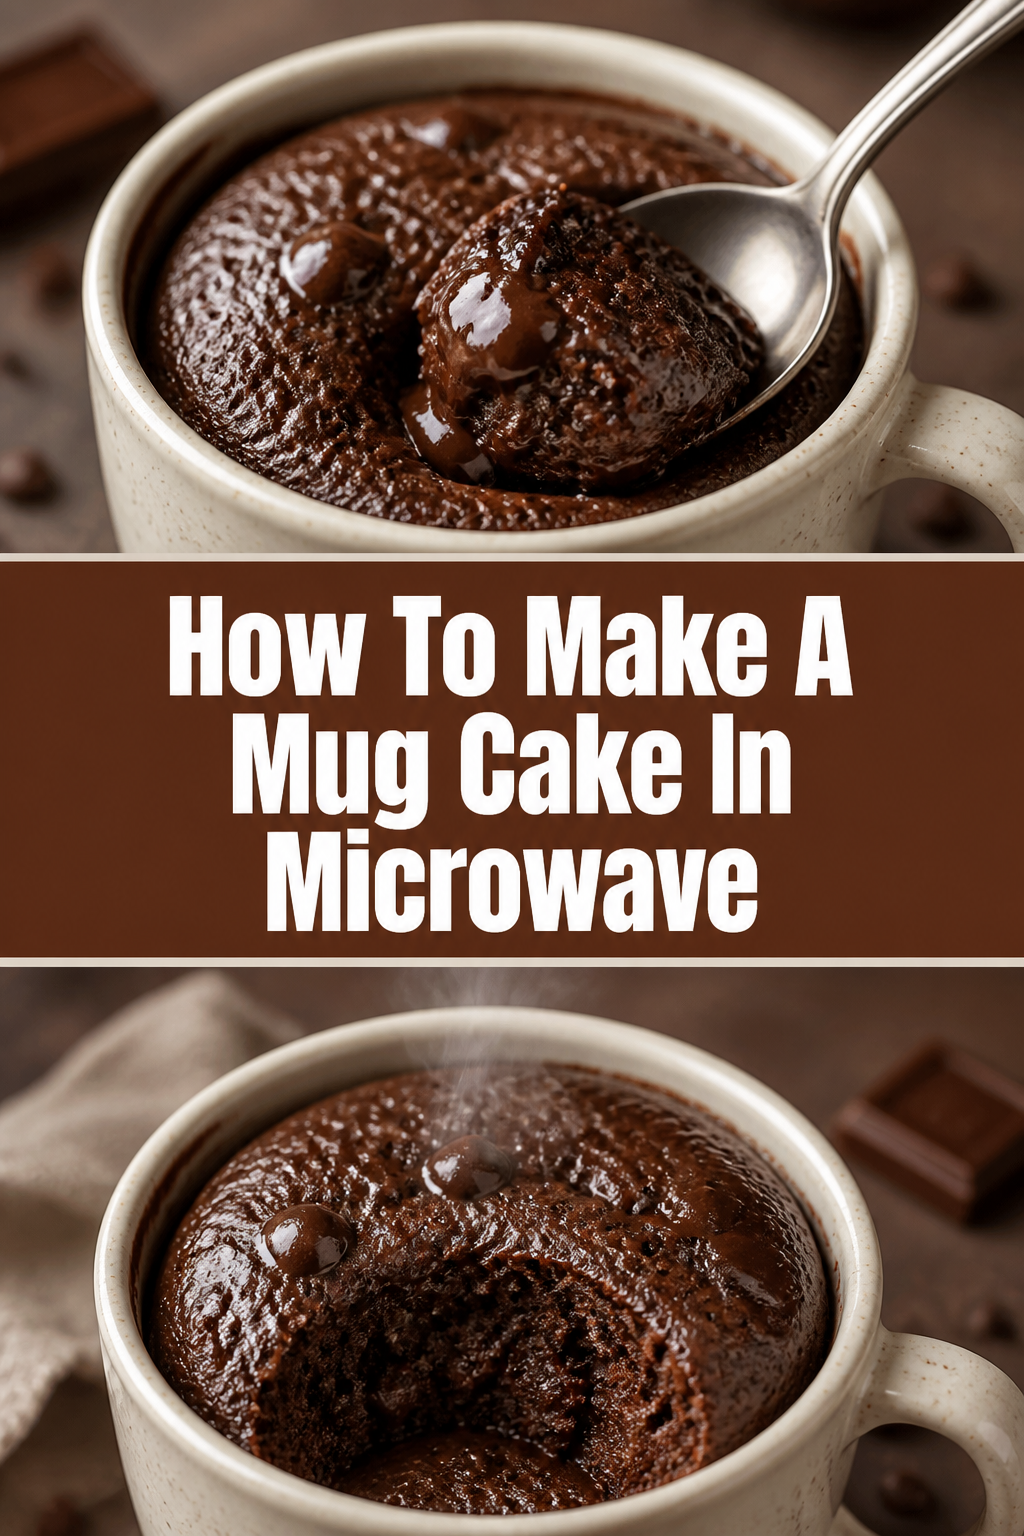
🍰 How To Make A Mug Cake In Microwave
I remember the first time I tried making a mug cake after a long day at work; it turned into a rubbery, sad hockey puck that ended up in the trash.
After months of experimenting with flour ratios and microwave wattages in my own kitchen, I finally cracked the code for a dessert that actually tastes like real cake.
This guide shares my tried-and-true method so you can skip the frustration and enjoy a warm, gooey treat in less than five minutes.

Quick Overview
Creating a microwave mug cake is the ultimate shortcut for satisfying a sweet tooth without the mess of traditional baking.
- Time needed: 5 minutes (2 minutes prep, 1-2 minutes cooking, 1 minute resting)
- Difficulty: Beginner
- What you’ll need: A microwave-safe mug, a small fork or whisk, basic pantry staples (flour, sugar, cocoa, oil, milk).
Step-by-Step Instructions
Step 1: Select Your Vessel Wisely
The mug you choose is the foundation of your entire baking experience and determines how well the heat circulates.
Pick a microwave-safe ceramic mug that holds at least 12 ounces of liquid to prevent the batter from overflowing during the rising process.
Check the bottom of the mug for a “microwave safe” label to ensure it won’t crack or become dangerously hot to the touch.
Avoid using narrow or overly tall mugs, as these can cause the center of the cake to remain raw while the edges overcook.
Pro Tip: A wider, shallower mug often results in a more even cook and provides more surface area for toppings like ice cream.
Step 2: Measure and Whisk Dry Ingredients
Starting with your dry components ensures that you won’t have pockets of unmixed flour at the bottom of the mug.
Add 4 tablespoons of all-purpose flour, 2 tablespoons of granulated sugar, and 2 tablespoons of unsweetened cocoa powder directly into the mug.
Include a tiny pinch of salt and 1/4 teaspoon of baking powder to help the cake rise and balance the sweetness of the chocolate.
Whisk these ingredients thoroughly with a fork until the color is uniform and there are no large clumps of cocoa powder visible.
Ensure you reach the very bottom “corners” of the mug where dry flour tends to hide during the mixing process.
Step 3: Introduce the Liquid Elements
Liquid ingredients provide the moisture and fat necessary to create a tender crumb rather than a dry sponge.
Pour in 3 tablespoons of milk (dairy or plant-based) and 2 tablespoons of a neutral oil like vegetable or melted coconut oil.
Add a few drops of pure vanilla extract to enhance the depth of the chocolate flavor and provide a bakery-style aroma.
Substitute the oil with melted butter if you prefer a richer, more traditional cake flavor, though oil often keeps the cake moister in the microwave.
Pro Tip: If you use melted butter, let it cool slightly before adding it to avoid prematurely “cooking” the other ingredients.
Step 4: Combine into a Smooth Batter
The goal here is a silky consistency that looks like thick chocolate syrup without any white streaks of flour.
Stir the mixture gently at first to avoid splashing the liquid over the sides of the mug.
Increase your speed once the flour is mostly incorporated, using the fork to beat out any stubborn lumps.
Scrape the sides of the mug frequently to make sure every bit of batter is fully integrated into the mix.
Stop mixing as soon as the batter is smooth, as over-mixing can lead to a tough, gummy texture once the cake is cooked.
Step 5: Add Texture and Flavor Boosters
This is where you can get creative and transform a basic recipe into a gourmet dessert tailored to your preferences.
Drop a tablespoon of chocolate chips, peanut butter chips, or crushed nuts into the batter for added texture.
Push a teaspoon of peanut butter or hazelnut spread into the very center of the batter if you want a molten, lava-cake effect.
Sprinkle a few extra chocolate chips on the top so they melt into a glossy ganache-like layer while the cake cooks.
Pro Tip: Adding a teaspoon of water right on top of the batter before cooking creates steam that keeps the cake incredibly moist.
Step 6: Master the Microwave Timing
Microwaves vary wildly in power, so timing is the most critical variable in the entire process.
Place the mug in the center of the microwave turntable to ensure the most even distribution of electromagnetic waves.
Set the timer for 90 seconds if you have a standard 1000-watt microwave, but start checking it at the 60-second mark.
Watch the cake through the door; it will rise significantly above the rim of the mug before settling back down.
Adjust the time in 10-second increments if the top still looks wet or shiny after the initial minute of cooking.
Step 7: Perform the Doneness Test
You want to stop the cooking process while there is still a tiny bit of moisture left to prevent the cake from turning into rubber.
Insert a toothpick or a clean knife into the center of the cake to check the internal consistency.
Look for a few moist crumbs clinging to the toothpick, which indicates the cake is perfectly cooked and ready to come out.
Remove the mug immediately if the toothpick comes out clean, as the residual heat will continue to cook the cake for another minute.
Step 8: Allow for a Brief Rest
Patience is the final ingredient in a successful mug cake, as the texture needs time to set properly.
Set the mug on a heat-resistant surface and let it sit undisturbed for at least 60 to 90 seconds.
Observe how the cake pulls away slightly from the sides of the mug as it cools and the steam stabilizes the crumb structure.
Top the cake with a scoop of cold vanilla ice cream or a dollop of whipped cream once the mug is cool enough to handle.
Common Mistakes to Avoid
Using Too Much Baking Powder
It is tempting to add extra leavening to get a bigger rise, but this is a mistake that ruins the flavor profile.
Too much baking powder leaves a metallic, bitter aftertaste that overwhelms the chocolate and sugar.
Stick strictly to the measurements provided to ensure the cake stays light without tasting like chemicals.
Overcooking the Batter
The most frequent error is leaving the cake in the microwave for too long because the top looks slightly soft.
Microwave cooking continues even after the power is off, a process known as carry-over cooking.
If you wait until the cake looks completely dry in the microwave, it will be hard and chewy by the time you eat it.
Skipping the Salt
Many people think salt is only for savory dishes, but it is essential for balancing the richness of a mug cake.
Without a pinch of salt, the sugar can taste flat and one-dimensional rather than deeply sweet.
A tiny amount of salt enhances the cocoa notes and makes the chocolate flavor pop against the heat.
Troubleshooting
The Cake is Rubbery and Chewy
This usually happens when you use too much flour or over-mix the batter after adding the liquid ingredients.
Over-mixing develops the gluten in the flour, which creates a bread-like texture rather than a soft cake crumb.
Next time, stir only until the flour disappears and ensure your measurements are level rather than heaped.
The Cake Overflowed the Mug
An overflow is typically caused by using a mug that is too small or adding too much baking powder to the mix.
The batter expands rapidly in the microwave, so it needs plenty of “headroom” to rise without spilling over the sides.
Always ensure the raw batter fills no more than half of the mug before you start the cooking process.
The Center is Raw While the Edges are Burnt
This is often a result of cooking at a power level that is too high for your specific microwave model.
If your microwave is exceptionally powerful, try cooking the cake at 70% power for a slightly longer duration.
This allows the heat to penetrate the center of the dense batter without scorching the outer edges that touch the ceramic.
Key Takeaways
- Always use a microwave-safe mug with a capacity of at least 12 ounces to avoid messy overflows.
- Mix the dry ingredients first to prevent flour pockets and ensure an even distribution of the leavening agent.
- Use oil instead of butter for a moister result, as oil stays liquid at room temperature and prevents the cake from drying out.
- Stop the microwave when the cake looks slightly tacky on top to account for carry-over cooking during the resting phase.
- Let the cake rest for one full minute before eating to allow the steam to set the delicate crumb structure.
Frequently Asked Questions
Can I make this mug cake gluten-free?
Yes, you can easily swap the all-purpose flour for a 1-to-1 gluten-free flour blend found at most grocery stores.
Avoid using single flours like almond or coconut flour on their own, as they require different liquid ratios to work correctly.
Gluten-free blends usually contain xantham gum, which helps mimic the structure of traditional wheat flour in the microwave.
Can I use water instead of milk?
Water works in a pinch, but the cake will lose some of the richness and creamy mouthfeel that milk provides.
If you are avoiding dairy, oat milk or soy milk are excellent alternatives that provide a similar fat content to cow’s milk.
If you must use water, consider adding an extra half-teaspoon of oil to compensate for the lost fats.
Why did my mug cake sink after I took it out?
A small amount of sinking is normal as the steam escapes and the air bubbles inside the cake cool down.
However, if it collapses significantly, you may have undercooked the cake or used expired baking powder that couldn’t hold the structure.
Ensure your baking powder is fresh and that the cake has a springy feel when touched before you stop the cooking process.
Our Top Recommended Finds
- Wide-Base Ceramic Mugs: These provide the perfect surface area for even microwave cooking and plenty of room for toppings.
- Miniature Silicone Whisks: A small whisk fits perfectly inside a mug and breaks up flour clumps much better than a standard fork.
- Digital Kitchen Scale: Measuring flour by weight rather than volume is the best way to ensure consistent results every time you bake.
Level Up Your Dessert Game
Now that you have mastered the fundamental chocolate mug cake, you can start experimenting with different flavor profiles like lemon poppyseed or peanut butter swirl.
Try swapping the cocoa powder for extra flour and adding a handful of sprinkles to create a birthday cake version in seconds.
Grab your favorite mug and give this recipe a try tonight; you are only five minutes away from the perfect warm dessert.