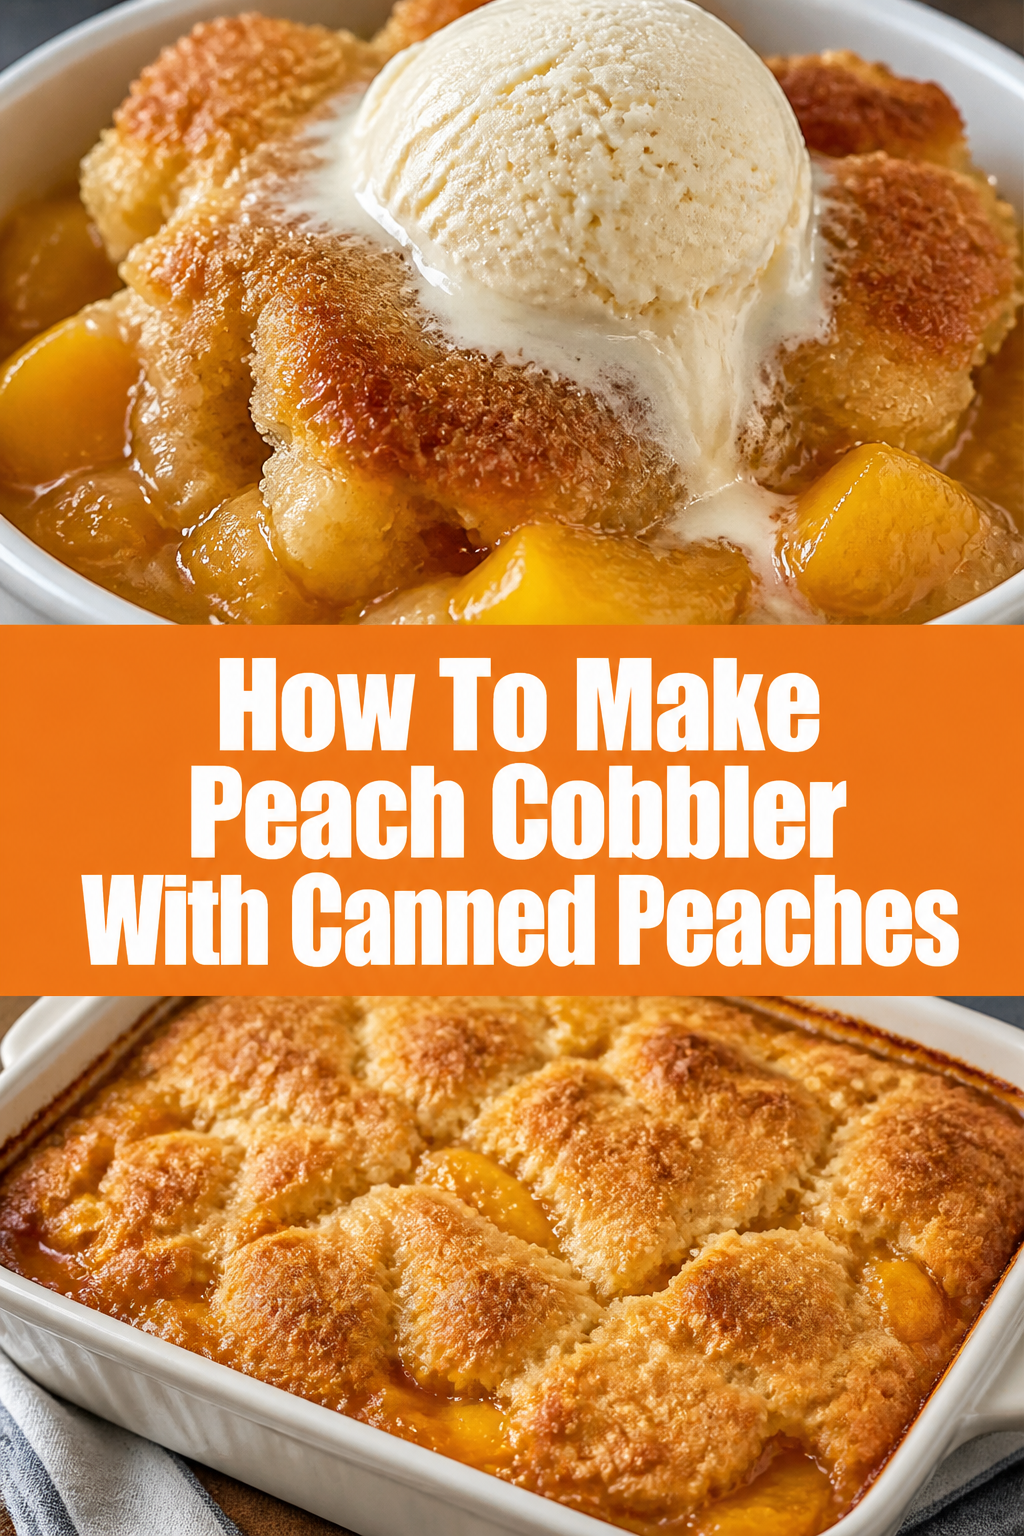
🍑 How To Make Peach Cobbler With Canned Peaches
I grew up in a kitchen where canned fruit was a pantry staple for those long winter months when fresh produce felt like a distant memory.
This recipe is the result of years spent tweaking my grandmother’s original method to ensure the crust stays crisp while the center remains gooey and rich.
You can trust this guide because it focuses on the science of the batter and the specific sugar-to-acid balance needed when working with preserved fruit.

Quick Overview
This recipe transforms humble pantry staples into a warm, comforting dessert that tastes like it came from a high-end bakery.
- Time needed: 60 minutes (10 minutes prep, 50 minutes baking)
- Difficulty: Beginner
- What you’ll need: Two 15-ounce cans of sliced peaches, all-purpose flour, sugar, butter, milk, and baking powder.
Step-by-Step Instructions
Step 1: Preheat Your Oven and Prepare the Dish
Set your oven to 375°F (190°C) and let it reach the full temperature before you even touch your ingredients.
Place a standard 9×13 inch baking dish on your counter to come to room temperature.
Cut one stick of unsalted butter (half a cup) into small cubes and drop them directly into the baking dish.
Slide the dish into the oven for a few minutes while it preheats so the butter melts completely without browning.
Pro Tip: Using unsalted butter allows you to control the exact amount of sodium in your crust, which prevents the dessert from tasting metallic.
Step 2: Drain and Season the Peaches
Open your cans of peaches and decide whether you want to use the heavy syrup or the light juice they are packed in.
Drain about 75% of the liquid from the cans into a separate bowl, leaving just enough to keep the fruit moist.
Pour the peaches into a mixing bowl and toss them with a teaspoon of cinnamon and a splash of vanilla extract.
Stir in a tablespoon of lemon juice to cut through the heavy sweetness of the canning syrup and brighten the fruit flavor.
Step 3: Whisk the Dry Ingredients
Measure one cup of all-purpose flour and sift it into a medium-sized mixing bowl to remove any clumps.
Add one cup of granulated white sugar and two teaspoons of baking powder to the flour.
Whisk these ingredients together thoroughly until the mixture is uniform in color and texture.
Toss in a pinch of salt to help balance the sugar and activate the leavening agents in the baking powder.
Pro Tip: If you want a deeper flavor, replace half of the white sugar with light brown sugar for a subtle molasses undertone.
Step 4: Create the Batter
Pour one cup of whole milk into the dry mixture slowly while whisking gently with your other hand.
Mix only until the flour is moistened and the large lumps have disappeared.
Avoid overworking the batter, as this develops gluten and will turn your light cobbler crust into something tough and bread-like.
Add a half-teaspoon of almond extract at this stage if you want to emphasize the stone fruit notes of the peaches.
Step 5: Layer the Components
Remove the baking dish with the melted butter from the oven carefully using thick oven mitts.
Pour the batter directly over the melted butter, but do not stir them together at all.
Spoon the seasoned peaches and their remaining syrup over the top of the batter in an even layer.
Watch as the batter begins to rise around the fruit, which is the secret to getting that classic “sunken” fruit look.
Step 6: Bake Until Golden Brown
Place the dish on the middle rack of your oven to ensure even heat distribution from both the top and bottom.
Bake for 45 to 55 minutes, checking the progress through the oven window after the 40-minute mark.
Look for the edges to pull away slightly from the sides of the pan and the top to turn a deep, golden amber.
Insert a toothpick into the cake-like portion of the crust to ensure it comes out clean and free of wet batter.
Pro Tip: Sprinkle a tablespoon of coarse sanding sugar over the top during the last five minutes of baking for a professional-looking crunch.
Step 7: Allow the Cobbler to Rest
Transfer the hot dish to a wire cooling rack immediately after removing it from the oven.
Wait at least 15 to 20 minutes before serving so the fruit juices can thicken and the crust can set.
Observe how the cobbler “slumps” slightly as it cools, which creates that perfect texture for soaking up melted ice cream.
Common Mistakes to Avoid
Using All the Can Syrup
Many beginners pour the entire contents of the peach cans, including all the syrup, into the baking dish.
This introduces far too much liquid into the recipe and results in a soggy, boiled texture rather than a baked one.
The excess sugar in the syrup can also burn the bottom of the cobbler before the top is even cooked.
Stirring the Layers
It is incredibly tempting to stir the butter, batter, and fruit together once they are all in the pan.
If you stir the mixture, you destroy the distinct layers that make a cobbler unique.
The goal is for the batter to fry slightly in the butter and then rise through the fruit, creating a varied texture.
Overmixing the Batter
Mixing the flour and milk until the batter is perfectly smooth is a common error in cobbler making.
A few small lumps are actually beneficial because they indicate that the gluten has not been over-developed.
Overmixed batter leads to a rubbery crust that feels more like a dense pancake than a light cake.
Troubleshooting
The Crust is Too Doughy
If the top looks brown but the inside feels like raw dough, your oven temperature might be running too high.
This causes the exterior to cook rapidly while the interior remains cold and wet.
Try tenting the dish with aluminum foil and lowering the temperature by 25 degrees for the final ten minutes of baking.
The Filling is Too Runny
A runny filling usually happens when the peaches weren’t drained enough or if the fruit didn’t reach a high enough temperature to thicken.
Next time, you can toss the drained peaches in a teaspoon of cornstarch before adding them to the batter.
The cornstarch acts as a thickening agent that binds the juices into a glossy sauce as it heats up.
The Top is Too Pale
If your cobbler is fully cooked but looks white and unappealing, it needs a bit of direct heat to caramelize.
Move the rack to the highest position and turn on the broiler for 60 to 90 seconds.
Stay right by the oven door during this process, as the sugar in the crust can go from golden to burnt in a matter of heartbeats.
Key Takeaways
- Always melt the butter in the pan first to create a non-stick, flavorful base for the batter.
- Drain the majority of the liquid from the canned peaches to prevent the cobbler from becoming a soup.
- Resist the urge to stir the layers together, as the natural rising process creates the best texture.
- Whole milk provides the fat content necessary for a rich, tender crumb that complements the fruit.
- Letting the dish rest for 20 minutes is essential for the syrup to reach the right consistency.
- Adding an acid like lemon juice balances the cloying sweetness often found in canned preserves.
Frequently Asked Questions
Can I use peaches packed in water instead of syrup?
Yes, you can use water-packed peaches, but you will need to add about two tablespoons of extra sugar to the fruit mixture.
Peaches in water lack the infused sweetness of syrup-packed versions, so they can taste a bit bland without adjustment.
You might also find that water-packed peaches are softer, so handle them gently to avoid turning them into mush.
How do I store leftovers without them getting soggy?
Store your leftover cobbler in the refrigerator in an airtight container for up to three days.
To keep the crust from getting too soft, place a paper towel over the top of the dish before sealing the lid.
The paper towel absorbs the excess moisture that evaporates from the fruit as it sits in the fridge.
Is it possible to make this recipe gluten-free?
You can substitute the all-purpose flour with a high-quality gluten-free 1-to-1 baking blend.
Look for a blend that already contains xanthan gum to ensure the batter holds its structure during the rise.
Be aware that gluten-free flours often require a few extra minutes of baking time to lose their gritty texture.
Can I use frozen peaches instead of canned?
Frozen peaches work well, but they need to be thawed and drained completely before you use them.
Frozen fruit tends to release more water than canned fruit, so you may need to increase the cornstarch to two teaspoons.
Make sure to bring the thawed peaches to room temperature so they don’t lower the oven’s heat when you start baking.
Our Top Recommended Finds
- Ceramic 9×13 Baking Dish: A heavy ceramic dish retains heat better than glass, which helps the bottom of the cobbler get that perfect golden-brown crust.
- Stainless Steel Mesh Sifter: Sifting your flour and sugar ensures there are no pockets of dry ingredients in your final batter.
- Silicone Pastry Brush: This tool is perfect for spreading any remaining melted butter up the sides of the dish to prevent sticking.
Mastering Your Dessert Game
Once you have mastered this canned peach version, you can start experimenting with other canned fruits like pears or cherries.
The ratio of batter to fruit remains the same, allowing you to create a variety of cobblers regardless of the season.
Try serving your warm cobbler with a scoop of high-quality vanilla bean ice cream or a dollop of fresh whipped cream today.
There is nothing quite like the contrast between the cold cream and the steaming, buttery peaches to end a meal on a high note.