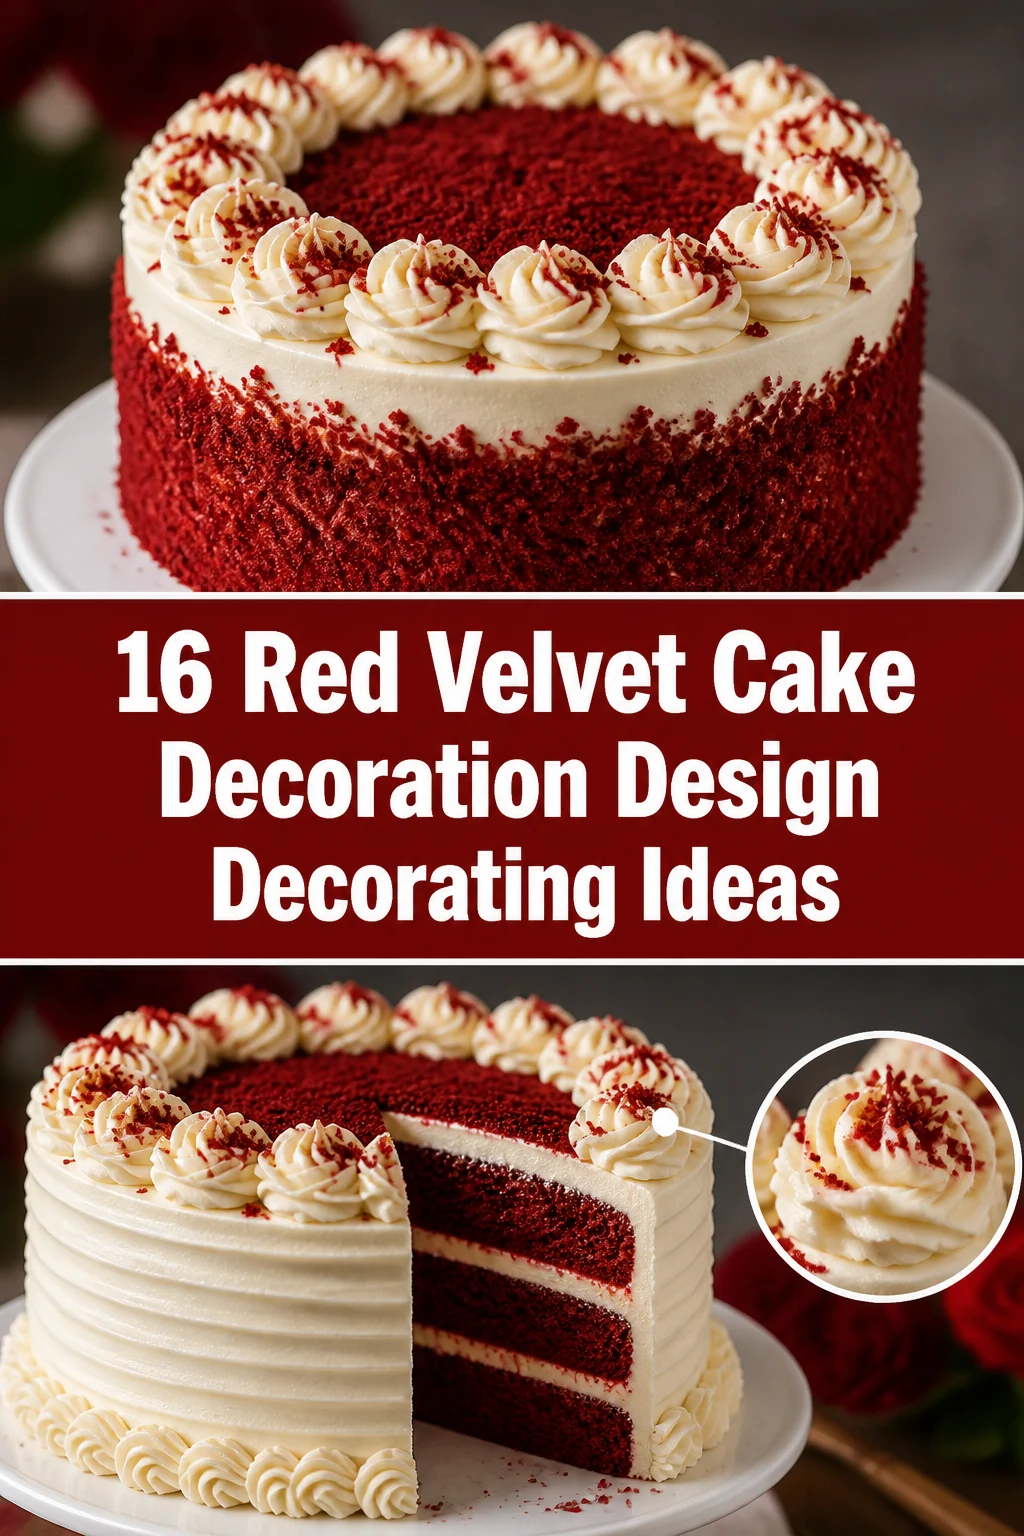
🍰 16 Red Velvet Cake Decoration Design Decorating Ideas
Planning a show-stopping dessert for your next gathering?
Red velvet cake, with its striking color and tender crumb, deserves a decoration that truly shines.
This curated collection of 16 decorating ideas will transform your cake into an unforgettable masterpiece with ease.
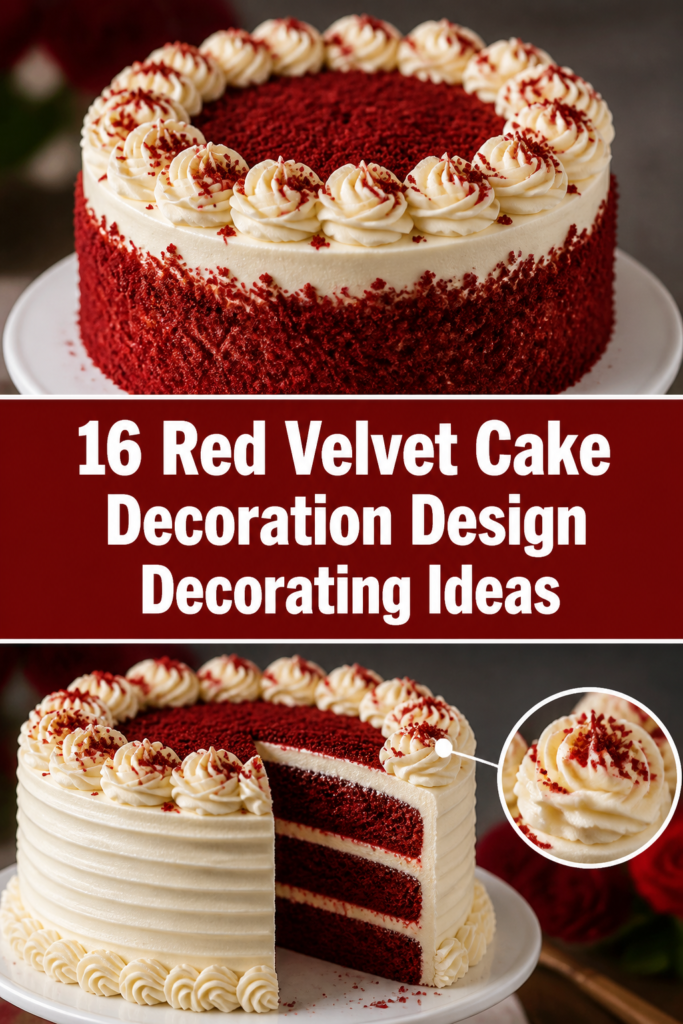
1. Classic Cream Cheese Frosting Swirls
- Key Ingredients: Cream cheese frosting, offset spatula.
How to make it:
- Evenly apply chilled cream cheese frosting to your cooled, crumb-coated red velvet cake.
- Use an offset spatula to create soft peaks and elegant valleys. Gently lift and twist for inviting swirls.
- Optionally, pipe small rosettes around the cake’s edges for a refined finish.
Why you’ll love it: This timeless look highlights tangy cream cheese, offering rustic elegance and promising a delicious bite.
Time to make: 15 minutes.
Pro Tip: Chill both cake and frosting well; it ensures easier, cleaner swirl creation.
2. Elegant White Chocolate Drip
- Key Ingredients: White chocolate, heavy cream, red velvet crumbs.
How to make it:
- Prepare a simple white chocolate ganache by melting chocolate with warm cream. Let it cool slightly until thickened but still pourable.
- Carefully spoon the ganache around the cake’s top edge, allowing it to gently cascade down the sides in beautiful drips.
- Sprinkle a few vibrant red velvet cake crumbs onto the wet ganache for contrasting texture and color.
Why you’ll love it: The smooth, sweet white chocolate perfectly complements the cake’s tang, creating a sophisticated visual appeal.
Time to make: 25 minutes (including cooling ganache).
Pro Tip: Test the ganache consistency on a glass before applying to the cake to ensure perfect drips.
3. Fresh Berry Medley Cascade
- Key Ingredients: Mixed fresh berries (strawberries, raspberries), mint leaves, powdered sugar.
How to make it:
- Once your cake is frosted, arrange a generous selection of fresh, colorful berries artfully on top.
- Let them tumble naturally down one side of the cake, creating a vibrant, organic cascade.
- Garnish with a few fresh mint leaves and a light dusting of powdered sugar for a final flourish.
Why you’ll love it: The bright, juicy berries offer a delightful contrast to the rich cake, adding freshness and natural beauty.
Time to make: 10 minutes.
Pro Tip: Choose berries that are perfectly ripe and vibrant for the best visual impact and flavor.
4. Delicate Cream Cheese Rosettes
- Key Ingredients: Cream cheese frosting, piping bag, star tip (Wilton 1M).
How to make it:
- Fill a piping bag fitted with a large star tip with chilled cream cheese frosting.
- Starting from the center, pipe small, tight spirals to form elegant rosettes across the entire top surface of the cake.
- Continue piping rosettes until the entire top is covered, creating a stunning, textured floral effect.
Why you’ll love it: These charming rosettes create a luxurious, textured top that’s both beautiful to behold and incredibly delicious to eat.
Time to make: 20-30 minutes.
Pro Tip: Keep your frosting cool for sharp, defined rosettes; chill the piping bag if it gets too warm.
5. Velvet Crumb Border
- Key Ingredients: Leftover red velvet cake crumbs, frosted cake.
How to make it:
- After frosting your cake, gently press a handful of fresh, vibrant red velvet cake crumbs onto the bottom edge.
- Continue around the entire circumference, creating a soft, textural border that highlights the cake’s signature color.
- Optionally, sprinkle a few crumbs on top for a cohesive look.
Why you’ll love it: This simple yet effective decoration emphasizes the cake’s iconic red color and adds a lovely, tender texture to each slice.
Time to make: 5-10 minutes.
Pro Tip: Freeze leftover cake scraps, then grate them for perfect, fluffy crumbs when needed.
6. Ombre Frosting Layers
- Key Ingredients: Cream cheese frosting, red food coloring, piping bags.
How to make it:
- Divide cream cheese frosting into three bowls. Leave one white, lightly tint the second pink, and deeply tint the third red.
- Frost the bottom third of your cake with the deepest red, the middle with pink, and the top with white.
- Gently blend the color transitions with an offset spatula for a seamless, gradient effect.
Why you’ll love it: The captivating color progression from deep red to soft white creates a sophisticated and visually stunning presentation.
Time to make: 30-40 minutes.
Pro Tip: Use gel food coloring for vibrant, true colors without thinning your frosting.
7. Luxurious Gold Leaf Accents
- Key Ingredients: Edible gold leaf sheets, tweezers, frosted cake.
How to make it:
- Carefully remove a sheet of edible gold leaf from its packaging.
- Using clean tweezers, gently pick up small pieces of the gold leaf.
- Artfully place the gold leaf onto strategic areas of your frosted cake, such as edges, swirls, or a central cluster.
Why you’ll love it: Gold leaf adds an instant touch of luxury and glamour, making your red velvet cake truly sparkle and feel special.
Time to make: 15 minutes.
Pro Tip: Work in a draft-free area; gold leaf is incredibly delicate and can fly away easily.
8. Piped Heart Mini Cakes
- Key Ingredients: Red velvet cupcakes, cream cheese frosting, heart-shaped cookie cutter, piping bag.
How to make it:
- Bake red velvet cupcakes. Once cooled, use a small heart-shaped cookie cutter to cut heart shapes from the top of a few.
- Frost your main red velvet cake. Arrange the small red velvet hearts artistically on top.
- Pipe small, delicate dots or swirls of cream cheese frosting around each heart for definition.
Why you’ll love it: This charming design is perfect for romantic occasions, offering delightful mini red velvet treats on top of the main cake.
Time to make: 25 minutes (assuming cupcakes are baked).
Pro Tip: For extra contrast, dust the heart cut-outs with powdered sugar before placing them.
9. Chocolate Shard Crown
- Key Ingredients: Dark or white chocolate, parchment paper, offset spatula.
How to make it:
- Melt chocolate and spread it thinly onto a sheet of parchment paper. Let it set slightly but not completely harden.
- Using an offset spatula or knife, cut or break the chocolate into irregular shards of various sizes.
- Once fully set, arrange these chocolate shards upright around the top edge of your frosted cake, creating a dramatic crown.
Why you’ll love it: The crisp chocolate shards add a sophisticated, architectural element and a delightful textural crunch to each slice.
Time to make: 30 minutes (including setting time).
Pro Tip: Tempering your chocolate will ensure shiny, snappy shards that hold their shape beautifully.
10. Edible Flower Garland
- Key Ingredients: Assorted edible flowers (pansies, violas, roses), frosted cake.
How to make it:
- Carefully select and rinse a variety of beautiful, food-safe edible flowers.
- Arrange them in a flowing garland pattern across the top of your cake, or along the base.
- Gently press the stems into the frosting to secure them in place, creating a natural, elegant display.
Why you’ll love it: Edible flowers add an ethereal, delicate beauty and a subtle, fresh aroma, making the cake feel truly special and refined.
Time to make: 15 minutes.
Pro Tip: Ensure your chosen flowers are genuinely edible and pesticide-free; source them from a reputable supplier.
11. Rustic Naked Cake Finish
- Key Ingredients: Minimal cream cheese frosting, offset spatula, cake layers.
How to make it:
- Stack your cooled red velvet cake layers with generous fillings of cream cheese frosting between each.
- Apply a very thin, almost translucent layer of frosting to the sides, allowing the rich red cake to peek through.
- Leave the top edge slightly uneven or decorate with a simple berry and mint garnish for a charmingly rustic look.
Why you’ll love it: This trend-setting style showcases the vibrant red layers and tender crumb, offering a chic, understated elegance.
Time to make: 20 minutes.
Pro Tip: For a cleaner look, use a bench scraper to smooth the thin frosting layer on the sides.
12. Geometric Fondant Cut-outs
- Key Ingredients: White or gold fondant, geometric cookie cutters, cornstarch.
How to make it:
- Roll out fondant thinly on a surface dusted with cornstarch to prevent sticking.
- Use various geometric cookie cutters (triangles, hexagons, squares) to cut out desired shapes.
- Arrange the fondant shapes artistically on the top and sides of your frosted cake, pressing gently to adhere.
Why you’ll love it: This modern design adds a crisp, contemporary edge and a smooth textural contrast to the soft cake and frosting.
Time to make: 30 minutes.
Pro Tip: For extra shine, lightly brush fondant pieces with a touch of edible luster dust before placing them.
13. Simple Red Sprinkles Border
- Key Ingredients: Red sprinkles (nonpareils or jimmies), frosted cake.
How to make it:
- After frosting your cake, hold it carefully over a large plate or tray to catch excess sprinkles.
- Gently press red sprinkles onto the bottom edge of the cake, creating a festive, vibrant border.
- Optionally, sprinkle a few across the top for a playful, celebratory feel.
Why you’ll love it: This easy yet impactful decoration adds a joyful pop of color and a fun, crunchy texture, perfect for any celebration.
Time to make: 5 minutes.
Pro Tip: Use a piece of parchment paper under the cake to easily collect and reuse fallen sprinkles.
14. Marbled Fondant Topper
- Key Ingredients: White fondant, red food coloring, rolling pin, sharp knife.
How to make it:
- Knead a small amount of red food coloring into a portion of white fondant until just marbled, not fully blended.
- Roll out the marbled fondant into a thin circle slightly smaller than your cake’s top.
- Carefully place the marbled fondant disk onto the center of your frosted cake for a striking, artistic finish.
Why you’ll love it: The elegant marbled effect offers a unique, artistic touch, showcasing the beautiful blend of red and white.
Time to make: 20 minutes.
Pro Tip: Don’t over-knead the fondant; stop when the marble pattern is distinct and appealing.
15. Mirror Glaze Shine
- Key Ingredients: White chocolate, gelatin, sugar, water, red food coloring.
How to make it:
- Prepare a classic mirror glaze, incorporating a touch of red food coloring for a subtle tint or leaving it stark white.
- Ensure your frosted cake is thoroughly chilled. Pour the warm, fluid glaze over the entire cake, allowing it to drip evenly.
- Let the glaze set to a brilliant, reflective finish that truly mesmerizes.
Why you’ll love it: The glossy, smooth mirror glaze creates an incredibly sophisticated and professional look, offering a delightful textural contrast.
Time to make: 45 minutes (including glaze preparation and setting).
Pro Tip: Use a thermometer to ensure your glaze is at the perfect pouring temperature (around 90-95°F or 32-35°C).
16. Monogrammed Initial Fondant
- Key Ingredients: White fondant, letter cookie cutters, edible gold paint or spray.
How to make it:
- Roll out a piece of white fondant thinly. Use a chosen letter cookie cutter to cut out an initial.
- Carefully place the fondant initial onto the very center of your frosted cake.
- For an extra touch of elegance, lightly brush the initial with edible gold paint or spray it with edible gold luster.
Why you’ll love it: This personalized decoration adds a thoughtful and bespoke touch, perfect for birthdays, anniversaries, or special celebrations.
Time to make: 20 minutes.
Pro Tip: Let the fondant initial dry slightly before painting to prevent smudges and ensure a cleaner finish.
Our Top Recommended Finds
- Offset Spatula Set: Essential for smooth frosting application and creating elegant swirls and peaks on your cakes.
- Piping Bag and Tip Kit: A versatile set allows you to create everything from delicate rosettes to intricate borders with ease.
- Edible Food Coloring Gels: These concentrated gels provide vibrant, rich colors for frostings and fondants without altering consistency.
Which Recipe Will You Try First?
From elegant simplicity to intricate designs, these ideas offer something for every skill level and occasion.
Each one promises to enhance that irresistible red velvet flavor and vibrant hue.
Which stunning design will you choose to adorn your next delicious red velvet creation? Share your favorites in the comments below!