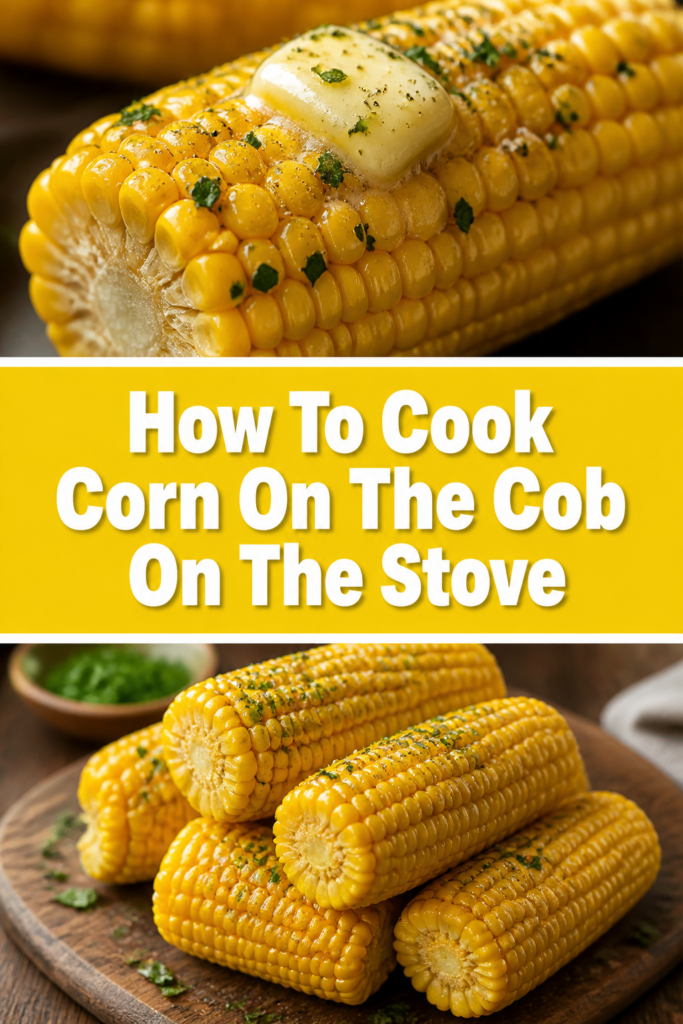
🌽 How To Cook Corn On The Cob On The Stove
There’s nothing quite like the sweet, crisp taste of perfectly cooked corn on the cob. It instantly brings to mind summer picnics and backyard barbecues, a simple pleasure that delights everyone. I’ve spent countless summers perfecting this method, ensuring each kernel bursts with flavor.
This guide will show you exactly how to achieve that perfect bite, right from your kitchen stove.
Quick Overview
This guide will walk you through preparing delicious corn on the cob that’s tender, sweet, and bursting with flavor. You’ll learn how to select the best ears, prepare them, and cook them to perfection. Get ready to elevate your mealtime with this classic side dish.
- Time needed: 20-30 minutes (including prep)
- Difficulty: Beginner
- What you’ll need: Fresh corn on the cob, large pot, tongs, butter, salt
Step-by-Step Instructions
Step 1: Choose Your Corn Wisely
Begin by selecting the freshest corn on the cob available. Look for ears with bright green husks that are tightly wrapped. The silk at the top should be slightly damp and golden or brown, not dry or black.
Feel the kernels through the husk; they should be plump and firm, filling out the ear completely. Avoid ears with visible holes or discoloration, as these can indicate pests or spoilage.
Step 2: Husk and Prepare the Corn
Carefully peel back the green husks from each ear of corn. You can either pull them all the way down to the base and break them off, or leave them attached for a rustic “handle” if you prefer.
Once the husks are removed, peel away all the silky threads adhering to the kernels. A clean kitchen towel or a soft brush can help remove stubborn strands.
Rinse each ear under cool running water to remove any remaining silk or debris. Pat them gently dry with a clean cloth or paper towel.
Pro Tip: To make husking easier, microwave the corn for 30 seconds to 1 minute before peeling. The husks and silk will slide off effortlessly.
Step 3: Fill Your Pot with Water
Choose a pot large enough to comfortably submerge all your corn on the cob. A stockpot or a large Dutch oven usually works best for multiple ears.
Fill the pot with enough cold water to cover the corn completely once it’s added. Ensure there’s a few inches of space above the water line to prevent boiling over.
Step 4: Season the Water (Optional, but Recommended)
While some purists argue against it, adding a pinch of sugar to the water can enhance the corn’s natural sweetness. A teaspoon of sugar per gallon of water is a good starting point.
Avoid adding salt to the cooking water. Salt can toughen the corn kernels, making them less tender. It’s best to season the corn after it’s cooked.
Step 5: Bring Water to a Rolling Boil
Place the pot on your stove over high heat. Bring the water to a vigorous, rolling boil. This can take several minutes, depending on the volume of water.
A rolling boil means the water is bubbling rapidly and continuously throughout the pot. This high heat is crucial for quick and even cooking.
Step 6: Add the Corn to the Boiling Water
Carefully place the prepared corn on the cob into the boiling water. Use tongs to gently lower each ear to avoid splashing hot water. Do not overcrowd the pot.
If you have too many ears for your pot, cook them in batches. Overcrowding can lower the water temperature too much, leading to uneven cooking.
Step 7: Cook the Corn to Perfection
Once the corn is in the pot, the water temperature will drop slightly. Allow the water to return to a boil. Once it’s boiling again, set a timer.
Cook the corn for 3-5 minutes. Fresh, tender corn only needs a short cooking time. Overcooking will make the kernels mushy and diminish their flavor.
Pro Tip: For extremely fresh, very young corn, sometimes as little as 2 minutes of boiling is enough. Taste a kernel to test for doneness.
Step 8: Remove the Corn from the Pot
When the cooking time is up, carefully remove the corn from the boiling water. Use sturdy tongs to lift each ear out, allowing excess water to drain back into the pot.
Transfer the cooked corn to a serving platter or individual plates. Be mindful of the steam and hot water.
Step 9: Serve Immediately and Season
Serve the corn on the cob while it’s still hot. This is when its flavor and texture are at their peak.
Offer a variety of seasonings for guests to personalize their corn. Classic choices include butter, salt, and black pepper.
You can also try a sprinkle of paprika, chili powder, or a squeeze of lime juice for a different twist. Get creative with your toppings!
Common Mistakes to Avoid
Overcooking the Corn
One of the most frequent errors is cooking corn for too long. Fresh corn is naturally sweet and tender, requiring only a brief time in boiling water. Overcooking makes the kernels tough, chewy, and can extract their natural sugars, leaving them bland.
To avoid this, stick to the 3-5 minute rule once the water returns to a boil. Test a kernel if you’re unsure; it should be tender-crisp.
Adding Salt to the Cooking Water
It’s a common misconception that salting the water enhances flavor. For corn on the cob, adding salt to the boiling water can actually draw moisture out of the kernels. This process can make them tougher and less juicy.
Always season your corn after it has been cooked. Butter, salt, and other seasonings will adhere better and provide a more pleasant texture.
Overcrowding the Pot
Trying to cook too many ears of corn in a single pot can significantly lower the water temperature. This prevents the water from returning to a boil quickly and leads to uneven cooking. Some ears might be undercooked, while others could be overcooked by the time they are all done.
Cook corn in batches if your pot isn’t large enough to comfortably submerge all ears without a drastic temperature drop. This ensures consistent results.
Not Removing Enough Silk
Leftover silk threads can be unappetizing to eat. While a few strands are harmless, a significant amount can detract from the experience of biting into a clean, juicy ear of corn. It’s worth taking the extra minute to properly clean each ear.
After husking, use a dry paper towel, a clean kitchen brush, or even your hands to meticulously remove as much silk as possible. Rinsing under water can help, too.
Troubleshooting
Corn is Too Tough or Chewy
If your corn turns out tough, it’s highly likely it was overcooked. Fresh corn needs very little time to become tender. Boiling it for too long can break down the cell walls excessively, leading to a chewy texture.
To fix this next time, reduce your cooking time. For very fresh, young corn, 2-3 minutes after the water returns to a boil might be plenty. Alternatively, if you added salt to the water, that could also be the culprit; avoid salting the cooking water.
Corn Lacks Sweetness
Sometimes, even perfectly cooked corn can taste a bit bland. This often indicates that the corn wasn’t as fresh as it could have been. The natural sugars in corn begin to convert to starch soon after harvesting.
For sweeter corn, try to buy it on the day you plan to cook it, or as close as possible. Look for local farm stands during peak season. You can also add a teaspoon of sugar to the cooking water to enhance any inherent sweetness.
Kernels Are Mushy
Mushy corn is a clear sign of severe overcooking. The delicate kernels have been boiled past their prime, losing their crispness and becoming soft and unappealing. This can also happen if the corn was old and starchy to begin.
Ensure you are cooking for no more than 5 minutes once the water returns to a full boil. For optimal results, aim for 3-4 minutes. Always start with the freshest corn available to prevent this issue.
Key Takeaways
- Choose corn with bright green husks and plump, firm kernels for the best flavor.
- Thoroughly remove all silk before cooking for a better eating experience.
- Do not add salt to the cooking water; it can toughen the corn.
- Cook corn for a short duration, typically 3-5 minutes, to maintain tenderness and sweetness.
- Serve corn immediately after cooking with butter and your favorite seasonings.
- Avoid overcrowding the pot to ensure even cooking and consistent results.
Frequently Asked Questions
Should I add milk or sugar to the cooking water?
Adding a small amount of sugar (about a teaspoon per gallon) to the cooking water can help enhance the corn’s natural sweetness, especially if the corn isn’t perfectly fresh. Adding milk or butter to the cooking water is generally unnecessary and doesn’t significantly improve flavor or texture for boiled corn. It can also make the water cloudy and potentially leave a film on the corn.
How do I keep corn warm for a party?
If you need to keep corn warm, once it’s cooked, drain it well and place it in a slow cooker on the “warm” setting. You can also wrap the cooked ears in foil and place them in an insulated cooler. The residual heat will keep them warm for a good hour or two without overcooking. Avoid leaving them in hot water for extended periods, as this will make them mushy.
Can I cook frozen corn on the cob on the stove?
Yes, you can cook frozen corn on the cob on the stove. There’s no need to thaw it first. Simply add the frozen ears directly to boiling water. The cooking time will be slightly longer than fresh corn, usually around 5-8 minutes, or until the kernels are tender and hot throughout. Always check for doneness before serving.
What’s the best way to store leftover corn on the cob?
To store leftover cooked corn on the cob, let it cool completely. Then, wrap each ear tightly in plastic wrap or aluminum foil, or place them in an airtight container. Store them in the refrigerator for up to 3-4 days. You can reheat them gently in the microwave or by briefly re-boiling them for a minute or two.
Our Top Recommended Finds
- Large Stockpot: Essential for cooking multiple ears of corn evenly without overcrowding. A good quality, heavy-bottomed pot ensures even heat distribution.
- Long-Handled Tongs: Perfect for safely adding and removing hot corn from boiling water. Look for silicone-tipped tongs to avoid scratching your cookware.
- Corn Holders: These small, pointed skewers make eating hot corn much easier and mess-free. They provide a firm grip and protect your hands from butter and heat.
Savoring the Sweetness
There you have it – a straightforward path to perfectly cooked corn on the cob, every single time. This simple method ensures you get tender, sweet kernels that burst with flavor, making any meal feel a little more special. It’s a testament to how the freshest ingredients, prepared with a little care, can yield the most delightful results.
Now that you’ve mastered the stove-top technique, why not experiment with different flavors? Try grilling your corn next time, or cutting the kernels off the cob to create a vibrant corn salad. The possibilities are endless once you have this delicious foundation. Go ahead, grab some fresh corn, and bring that taste of summer into your kitchen today!