🥔 How To Make A Baked Potato In Microwave
Life moves fast, and sometimes you need a satisfying meal without the wait. A perfectly “baked” potato from the microwave is a game-changer for busy schedules.
I’ve personally relied on this method countless times for a quick, hearty lunch or a simple dinner side.
This guide will show you exactly how to achieve that fluffy interior and tender skin, every single time.
Quick Overview
You’re about to master the art of making a delicious, fluffy baked potato using just your microwave. It’s surprisingly simple and incredibly fast.
- Time needed: 8-15 minutes (depending on potato size and microwave wattage)
- Difficulty: Beginner
- What you’ll need: Potato, fork, microwave, plate, optional toppings
Step-by-Step Instructions
Step 1: Choose Your Potato Wisely
Select the right potato for the job. Russet potatoes, also known as Idaho potatoes, are ideal for baking due to their high starch content and thick skin.
Their texture becomes wonderfully fluffy when cooked, making them perfect for a “baked” potato experience.
Aim for a medium-sized potato, roughly 6-8 ounces, for consistent cooking and manageable portions.
Pro Tip: Look for firm potatoes without any green spots, sprouts, or soft areas. These indicate freshness and quality.
Step 2: Give It a Good Wash
Rinse your potato thoroughly under cool running water. Use a vegetable brush to gently scrub away any dirt or debris clinging to the skin.
Even if you plan to discard the skin, this step is crucial for hygiene and preventing unwanted flavors from penetrating the potato.
Ensure all visible dirt is removed, as you don’t want any gritty surprises.
Step 3: Prepare for Cooking (The Prick)
Prick the potato all over with a fork. Make about 6-8 deep punctures around the entire surface.
This seemingly small step is vital. It allows steam to escape during cooking, preventing the potato from exploding in your microwave.
It also helps the potato cook more evenly, ensuring a consistent texture throughout.
Step 4: The First Microwave Round
Place the pricked potato directly onto a microwave-safe plate. Avoid wrapping it in plastic wrap, as this can steam the potato too much and make it soggy.
For a medium-sized potato (around 6-8 ounces), microwave on high for 5 minutes. If you have a larger potato, you might start with 6-7 minutes.
Microwave wattages vary, so these are starting points. Trust your appliance and adjust as needed.
Step 5: Flip and Continue Cooking
Carefully remove the plate from the microwave. The potato will be hot, so use oven mitts or a towel.
Flip the potato over to ensure even cooking. This helps prevent one side from becoming overcooked while the other remains undercooked.
Return the potato to the microwave and cook on high for an additional 3-5 minutes. Again, adjust based on potato size and microwave power.
Step 6: Check for Doneness and Rest
After the second cooking interval, carefully remove the potato. Squeeze it gently; it should feel soft and yield to pressure.
You can also insert a fork into the center; it should slide in easily with little resistance. If it still feels firm, microwave in 1-2 minute increments until tender.
Once cooked, let the potato rest on the plate for 2-3 minutes. This resting period allows the internal temperature to equalize, resulting in a more consistently cooked and fluffy interior.
Pro Tip: For slightly crispier skin, rub a tiny bit of olive oil and a pinch of salt on the potato before microwaving. This adds flavor and texture.
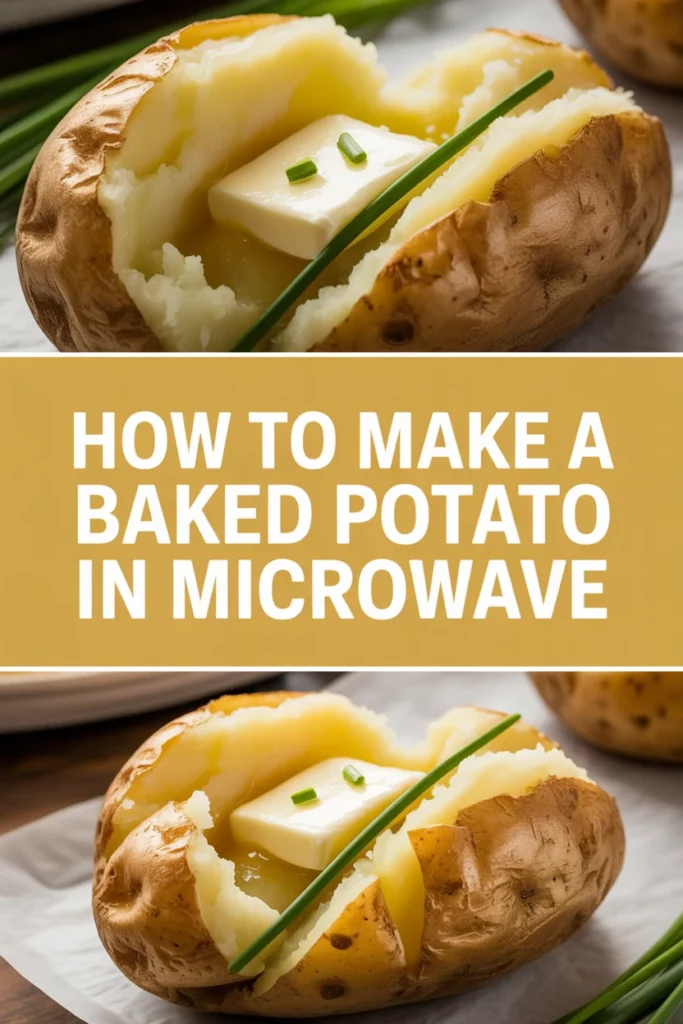
Step 7: Prepare for Toppings
Once rested, slice the potato lengthwise down the middle. Be careful not to cut all the way through; you want to create a pocket.
Gently fluff the interior flesh with a fork. This creates more surface area for butter and other toppings to melt into, enhancing flavor and texture.
Now your perfectly “baked” microwave potato is ready for your favorite additions.
Step 8: Load Up Your Toppings
This is where the real fun begins! Add your desired toppings generously to the fluffy interior.
Classic choices include butter, sour cream, chives, shredded cheese, bacon bits, or a sprinkle of salt and pepper.
Don’t be afraid to get creative with chili, salsa, guacamole, or even leftover pulled pork for a complete meal.
Common Mistakes to Avoid
Not Pricking the Potato
Forgetting to prick your potato before microwaving is a common oversight with potentially messy consequences. The internal steam builds up rapidly during cooking.
Without escape vents, this pressure can cause the potato to burst, creating a difficult-to-clean microwave disaster. Always take those few seconds to prick it thoroughly.
Overcooking the Potato
While you want a tender potato, overcooking can lead to a dry, mealy, or even rubbery texture. Microwaves cook quickly and intensely.
It’s better to undercook slightly and add short bursts of time than to go too long initially. Start with the recommended times and check frequently.
Undercooking the Potato
Conversely, an undercooked potato will be hard and unappetizing in the center. This often happens when cooking larger potatoes for too short a time or not flipping them.
Always check for tenderness by squeezing or inserting a fork. Don’t be afraid to add another minute or two until it’s perfectly soft throughout.
Wrapping in Aluminum Foil
Never, under any circumstances, wrap your potato in aluminum foil when microwaving. Aluminum foil is a metal and will cause sparks, potentially damaging your microwave or even starting a fire.
Use a microwave-safe plate instead. If you want to trap some moisture, a damp paper towel can be used, but it’s often unnecessary for a good result.
Troubleshooting
Potato is Still Hard in the Center
This usually means the potato needs more cooking time. Larger potatoes or lower-wattage microwaves often require extended cooking.
Return the potato to the microwave and cook in 1-2 minute increments. Flip it between intervals to ensure even heating.
Make sure you’ve pricked the potato adequately, as proper steam release aids in thorough cooking.
Potato is Dry and Mealy
A dry, mealy texture is a sign of overcooking. The moisture inside the potato has evaporated too much.
Next time, reduce your initial cooking time slightly and check for doneness earlier. If it’s already dry, adding extra butter, sour cream, or a moist topping can help salvage it.
Potato Skin is Tough or Chewy
This can happen if the potato has been microwaved for too long, causing the skin to dehydrate excessively. It can also occur if the potato wasn’t properly washed and scrubbed.
To mitigate this, ensure proper cooking times. For a softer skin, you can lightly dampen a paper towel and wrap it around the potato for the last minute of cooking, though this might make the skin less “baked-like.”
Key Takeaways
- Always prick your potato multiple times to prevent bursting and ensure even cooking.
- Russet potatoes are the best choice for a fluffy microwave baked potato.
- Cook in intervals and flip the potato to achieve consistent tenderness.
- Trust the squeeze test or fork test to determine doneness, not just the timer.
- Allowing the potato to rest briefly after cooking improves its texture.
- Don’t be afraid to customize with your favorite toppings for a personalized meal.
Frequently Asked Questions
Can I microwave more than one potato at a time?
Yes, you can microwave multiple potatoes simultaneously, but you’ll need to increase the cooking time. For two medium potatoes, start with 8-10 minutes, then flip and add another 6-8 minutes, checking for doneness.
Arrange them in a circle on the plate, leaving space between them for even heat distribution. It’s often better to cook larger batches in smaller increments.
How do I make the potato skin crispy in the microwave?
Achieving truly crispy skin in a microwave is challenging, as the microwave primarily steams rather than bakes. However, you can enhance the crispiness slightly by rubbing the potato with a little olive oil and salt before cooking.
For a genuinely crispy skin, you’d need to finish the potato in a regular oven or air fryer for 5-10 minutes after microwaving it until tender.
Can I use sweet potatoes instead of regular potatoes?
Absolutely! Sweet potatoes microwave beautifully and follow a very similar process. They tend to cook a bit faster than Russets due to their different starch and sugar content.
Start with slightly shorter cooking times, perhaps 4 minutes initially, then flip and add 3-4 minutes, checking for tenderness. Sweet potatoes are fantastic with butter, cinnamon, or even savory toppings.
What’s the best way to store leftover baked potato?
To store leftover baked potato, allow it to cool completely to room temperature within two hours. Then, place it in an airtight container or wrap it tightly in plastic wrap.
Refrigerate promptly and consume within 3-4 days. Reheat gently in the microwave or oven for best results, being careful not to dry it out.
Our Top Recommended Finds
- Vegetable Scrub Brush: Essential for thoroughly cleaning potatoes and other produce, ensuring no dirt ends up on your plate.
- Microwave-Safe Plate Set: Having reliable, sturdy plates that are safe for microwave use is fundamental for hassle-free cooking.
- Potato Masher: While not strictly for baking, a good masher is perfect for turning any leftover potato into a quick side dish or loaded mash.
Unlock Speedy, Satisfying Meals Today
You now hold the knowledge to create a perfectly “baked” potato in mere minutes, a true testament to the power of your microwave.
This simple technique isn’t just about speed; it’s about unlocking a world of quick, comforting meals and versatile side dishes.
Go ahead, grab a potato, and transform your next meal with this incredibly practical skill. Your taste buds and your schedule will thank you.